Welcome to the ultimate guide on Ethernet installation for homes and small businesses. In today's interconnected world, networks are vital in everything from modern homes to dynamic business environments, encompassing systems like point-of-sale (POS), security cameras, smart home devices, and office communication networks. This guide is designed for tech-savvy homeowners and small business owners looking to enhance their network infrastructure, providing a comprehensive understanding of Ethernet networking. Our goal is to not only inform but also to empower you with practical insights that can revolutionize your connectivity experience, seamlessly integrating technology into every facet of your daily life and business operations.
Understanding Ethernet Networking
What is Ethernet?
Ethernet is a widely-used networking technology that connects devices in a local area network (LAN). Compared to Wi-Fi, Ethernet is often favored for its superior speed, enhanced reliability, and robust security features. These advantages make Ethernet a preferred choice for many residential and commercial setups, especially in scenarios where high-speed data transfer and stable connectivity are crucial. While Wi-Fi provides the convenience of wireless access, Ethernet ensures a dedicated and interference-free connection, offering consistently higher speeds and a more secure network environment. This makes it especially suitable for activities that demand uninterrupted connectivity, such as video conferencing, large file transfers, and running high-bandwidth applications.
Benefits of Ethernet
- Speed: Think of Ethernet like a super-fast train carrying your internet data. It's much quicker than Wi-Fi, which is like a regular bus. Ethernet gets your online movies, games, and downloads to you faster.
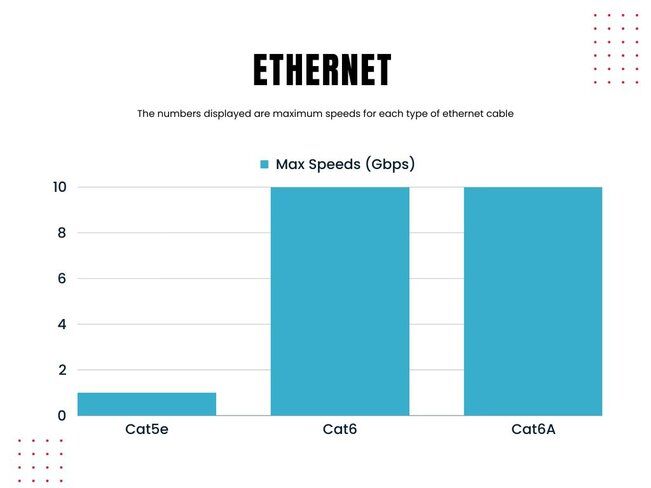
- Cat5e: Maximum speed up to 1 Gbps (Gigabit per second) at 100 MHz bandwidth.
- Cat6: Maximum speed up to 1 Gbps for up to 100 meters; can achieve 10 Gbps at 55 meters with 250 MHz bandwidth.
- Cat6A: Maximum speed up to 10 Gbps at 100 meters with 500 MHz bandwidth.
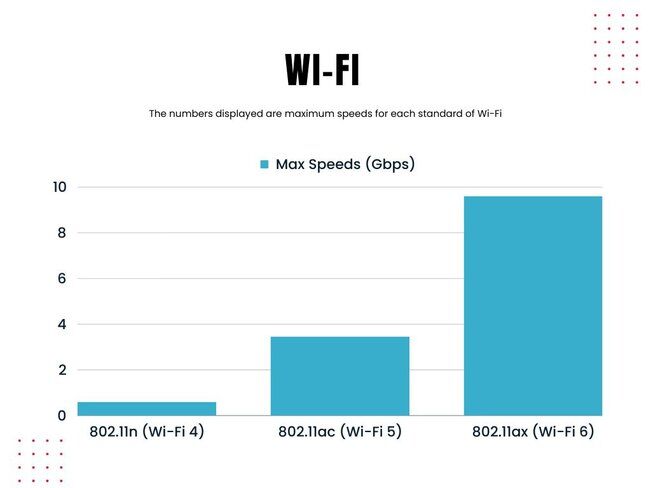
- 802.11n (Wi-Fi 4): Maximum speed up to 600 Mbps (Megabits per second). This is achieved with four spatial streams at a channel width of 40 MHz.
- 802.11ac (Wi-Fi 5): Maximum speed up to 3.46 Gbps. This is typically achieved with eight 160 MHz spatial streams.
- 802.11ax (Wi-Fi 6): Maximum theoretical speed up to 9.6 Gbps. Speeds vary greatly depending on the environment, number of devices, and other factors.
- Stability: Ethernet is like having a direct phone line. It's more reliable and doesn't get easily interrupted, unlike Wi-Fi, which can be like a walkie-talkie that sometimes gets static or loses signal.
- Security: Using Ethernet is like sending a letter in a locked box instead of a postcard. It's safer because it's harder for others to see what you're doing online, compared to Wi-Fi, where it's easier for unwanted guests to peek into your internet activities.
Planning Your Ethernet Installation
Identify the Purpose of Your Network:
- Determine what your network will be used for. Is it for general internet use, streaming, gaming, home automation, or business operations like POS systems? Consider the specific needs of each use case. For instance, a POS system may require a more stable and secure network compared to general internet browsing.
Basic Home Usage (Web Browsing, Email, Social Media):
- For simple tasks like web browsing, email, and social media, a basic setup with a reliable Wi-Fi router may be sufficient.
- If you have a small number of devices, such as a couple of laptops and Wi-Fi-equipped smartphones, an 802.11n or 802.11ac access point should meet your needs.
Home Office and Remote Work:
- If you work from home and require access to a corporate network, a robust router that supports VPN passthrough is essential. This ensures secure and seamless remote access to your work network.
- Consider both a dual-band router and a wired Ethernet solution with strong encryption standards to maintain both performance and security. This will also ensure all your devices access to the network
Online Gaming:
- For serious online gamers using services like PlayStation Network or Xbox Live, look for a router with advanced features like Quality of Service (QoS) to prioritize gaming traffic and port forwarding to improve connection stability and speed.
- A wired Ethernet connection can provide a more stable and faster experience than Wi-Fi, reducing latency in multiplayer games.
Streaming Video and Entertainment:
- If you regularly stream video content from services like Hulu or Netflix, especially in multiple rooms, a wired network infrastructure is advisable for consistent high-quality streaming.
- Ethernet connections to your streaming devices will ensure a more reliable and smoother viewing experience compared to Wi-Fi.
Homes with Spotty WiFi Coverage or Thick walls
- Homes especially older homes with walls made of brick make it very hard for wifi signals to travel and can degrade or even lose signal. Which results in spotty or slow WiFi signals resulting in slow internet speeds.
- For these types of situations consider running ethernet cables to separate wireless access points into strategic locations in the home to provide whole home coverage with strong signal
Home Automation and Smart Devices:
- For a network of smart home devices like thermostats, lights, and security cameras, consider both Wi-Fi and Ethernet options. Ethernet cable installations are ideal for stationary devices that require stable connections, while Wi-Fi offers flexibility for mobile or battery-powered devices.
- Ensure your router can handle multiple devices and offers strong security features to protect your smart home ecosystem.
Small Business Operations (POS Systems, Surveillance, etc.):
- Small businesses, particularly those with POS systems or surveillance cameras, need a stable and secure network. Ethernet provides reliability and enhanced security for sensitive transactions and data.
- Consider PoE (Power over Ethernet) switches for devices like IP cameras and VoIP phones to reduce cabling needs and simplify installations.
Large File Transfers and Media Production:
- For activities involving large file transfers, such as video editing or graphic design, a wired Ethernet network can significantly speed up file movement between devices.
- Look for routers and switches that support gigabit speeds to accommodate large data transfers efficiently.
Determine the Number of Devices to Connect:
List Your Current Devices:
- Start by making a list of all the devices that need a network connection. This includes not only computers and laptops but also printers, smart TVs, gaming consoles, and smart home devices like thermostats or security cameras.
- Don't forget mobile devices that might benefit from a wired connection for activities like streaming or gaming.
Consider IoT and Smart Home Devices:
- If you have or plan to have a smart home, include devices like smart speakers, security systems, and home automation hubs in your count.
- IoT devices in a small business setting, like sensors and smart POS systems, should also be considered.
Account for Guests or Temporary Devices:
- Think about guests who might need to connect to your network or temporary devices like a friend's gaming console or a work laptop.
- Having a few extra connections available can be helpful for these situations.
Plan for Future Expansion:
- Technology evolves quickly, and you might add more devices to your network over time. When planning, consider potential future needs like new gadgets or upgrades to existing ones.
- If you're a business, think about potential growth and the additional network devices that growth might bring.
Assess Usage Patterns:
- Understand how these devices will be used. For example, a device used for heavy online gaming or video editing might need a more stable and faster connection compared to one used for simple web browsing.
Determine Cable and Port Requirements:
- Based on the number of devices, determine how many Ethernet cables and ports you'll need. Remember, each wired device will need its own port on your router or switch.
- Consider switches with more ports than you currently need to accommodate future devices.
Consult with Professionals:
For complex setups or a large number of devices, it might be worthwhile to consult with an Ethernet cable installer/networking professional who can provide tailored advice for your specific situation.
- When an Electrician Might Help: Although you don't need an electrician to run Ethernet cables, their expertise can be beneficial in certain situations. If your setup involves multiple floors or needs integration with existing electrical systems, an electrician can ensure everything is safely and efficiently installed.
- Tailored Solutions: Networking professionals can offer customized solutions that address the unique challenges of your environment. This can be particularly helpful in large homes or offices where signal strength and device connectivity are crucial.
- By considering the specifics of your installation, you can decide whether consulting a networking expert, an electrician, or both will provide the best outcome for your Ethernet setup.
- We at TekDash can help anywhere from basic advise consultations or completely design and build our your solution. To start getting answers your questions on network cable installation go here: https://www.tekdash.com/tech-support/new-ethernet-cable-installation
Consider the Layout of Your Home or Office:
To ensure a successful Ethernet installation, it's crucial to think about the physical layout of your home or office.
Create a Detailed Map:
- Draw a floor plan of your home or office. Include all the rooms, hallways, and major furniture pieces.
- Mark the locations where your network devices (like routers and switches) and connected devices (like computers and smart TVs) will be.
- You can leverage UniFi’s free design center tool to help plan your network layout, including the placement of routers, switches, and access points.
- Consider using a 'rack to jack' strategy, where all connections run back to a centralized patch panel for easy management and scalability.
- The 'rack to jack' strategy is a way of organizing the cables in your home or office network. Imagine it like a tree: the 'rack' is the trunk, and the 'jack' is the branches. Here's how it works:
Centralized Patch Panel (The 'Rack'):
- The 'rack' is a central point where all your Ethernet cables connect. This is usually a patch panel, which is like a big board with lots of sockets (ports) where cables plug in.
- Think of the patch panel as the main hub or heart of your network. All the Ethernet cables from different rooms or areas come here.
Connections to Devices (The 'Jack'):
- The 'jack' is the endpoint of each Ethernet cable. This could be in different rooms, like your living room, home office, or any place where you have devices like computers, smart TVs, or WiFi access points.
- Each jack is where a cable ends and connects to a device.
Benefits of 'Rack to Jack' Strategy:Easy Management:
- Since all cables come to one central point, it's easier to manage and troubleshoot your network. If something goes wrong, you know where all the connections are.
- Scalability: If you want to add more devices in the future, you just add more cables from the patch panel to the new locations. It's like adding more branches to the tree without disturbing the rest.
- Organized and Efficient:This method keeps your network organized. Instead of cables running all over the place, they all neatly come to one spot.
- It's also efficient because it saves time and effort in maintaining the network.
- In simple terms, using a 'rack to jack' strategy means bringing all your Ethernet cables to one central place (the patch panel or 'rack'), and from there, they spread out to various devices across your home or office (the 'jack'). This makes your network like a well-organized tree, easy to manage and ready to grow!
- In simple terms, using a 'rack to jack' strategy means bringing all your Ethernet cables to one central place (the patch panel or 'rack'), and from there, they spread out to various devices across your home or office (the 'jack'). This makes your network like a well-organized tree, easy to manage and ready to grow!
Identify the Best Locations for Network Equipment:
- Choose a central location for your router and modem to ensure even coverage throughout your space.
- Consider places like a home office, living room, or a dedicated server room in a business setup, ensuring these areas are easily accessible for maintenance.
Spot Potential Obstacles for Cabling:
- Look for barriers that could complicate cable runs, such as thick walls, ceilings, floors, and large pieces of furniture.
- Remember that running cables through walls or ceilings might require an Ethernet installer's assistance and adherence to building codes.
Check the Wall Cavity & Drill Holes:
Before you start, ensure the wall cavity has enough space to accommodate the cables without compressing or damaging them. This step is crucial to prevent future connectivity issues and maintain cable integrity.
- Identify Drilling Points: Begin by marking spots near the top plates of the wall. This location helps maintain a clean line and provides easier access for future maintenance.
- Drill with Precision: Use a drill bit slightly larger than the cable to avoid stripping or crimping the wire casing as you feed it through. This attention to detail ensures a seamless installation and protects the cable from damage.
By combining these steps, you can ensure the cabling process is smooth and efficient, minimizing potential obstacles and ensuring a professional finish.
Plan Cable Routes:
- Decide on the paths your Ethernet cables will take from the router to various devices. Think about the most direct routes that avoid major obstructions.
- Consider using cable management solutions like conduits, raceways, or cable clips to keep cables organized and protected.
Evaluate Environmental Factors:
- Ensure the areas where cables run and where network equipment is stored are not prone to dampness or extreme temperatures, as these can damage equipment and cables.
- For server rooms or areas with multiple networking devices, ensure adequate ventilation to prevent overheating.
Accessibility and Safety:
- Make sure your network setup is safe and doesn’t create tripping hazards with loose cables.
- For homes with children or in a business environment, ensure that networking equipment and cables are out of reach or securely enclosed to prevent tampering.
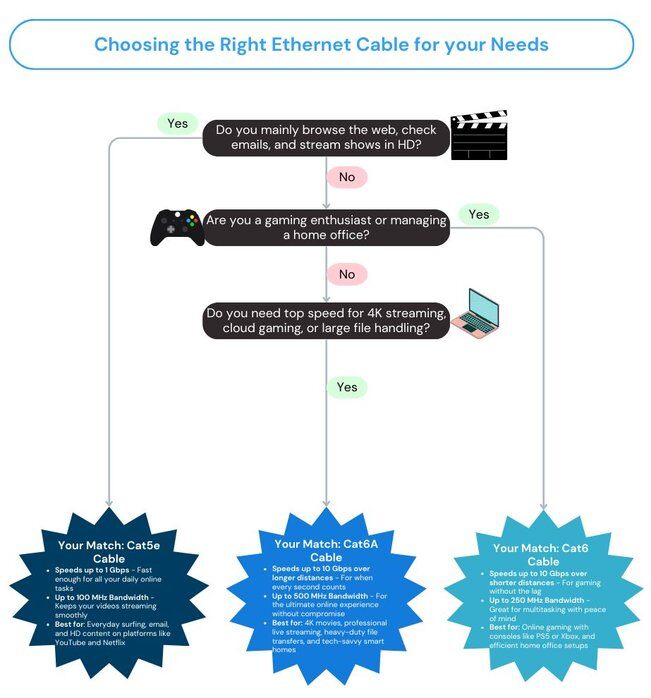
Choose the Right Cables and Equipment:
Selecting the Right Category of Ethernet Cable:
- Cat6A: Generally recommended for modern installations, Cat6A supports higher data transmission speeds and bandwidth, making it ideal for environments with heavy network usage, like busy offices or homes with many connected devices.
- Cat6: A reliable option for most current needs, Cat6 cables are capable of supporting gigabit speeds and are suitable for a variety of applications, from home networks to small businesses.
- Cat5e: While older than Cat6 and Cat6A, Cat5e cables are still a viable choice for budget-conscious setups or environments with less demanding network requirements.
Understanding Cable Ratings:
- Riser Rated Cables: Typically sufficient for residential installations, riser rated cables are designed to run between floors through cable risers or in elevator shafts.
- Plenum Rated Cables: Often required in commercial settings, plenum rated cables are used in spaces that facilitate air circulation for heating and air conditioning systems. These cables have a higher fire-resistance rating and emit less toxic smoke when burned.
Choosing Cables for Different Spaces:
- For wiring in homes, standard Cat6 cables are often sufficient, especially for plenum and riser spaces.
- In office settings, Cat6A is recommended for both plenum and riser spaces due to its higher performance characteristics, essential for supporting a variety of office network requirements.
Equipment Selection:
- Besides cables, you'll need other equipment like routers, switches, and possibly network interface cards (NICs) for devices without built-in Ethernet ports.
- For advanced setups or large spaces, consider additional components like network racks, patch panels, and cable management systems.
Top Choice: The Ideal Router for Your Networking Needs

|
Elevate your home's internet experience with the NETGEAR Orbi Quad-Band WiFi 6E Mesh System, the pinnacle of networking performance and coverage. This state-of-the-art system not only blankets every corner of your home with seamless Wi-Fi but also ensures that your connection is lightning-fast and unfailingly reliable.
Key Features:
- Cutting-Edge Quad-Band Technology: With a dedicated WiFi 6E backhaul, the Orbi Mesh System ensures maximum throughput, minimizing interference and maximizing speed for your devices.
- Expansive Coverage: Cover up to 9,000 sq. ft. with high-performance WiFi, which means no more dead zones in your home, be it in the attic workspace or the basement gym.
- Blazing-Fast Speeds: Capable of speeds up to 10.8Gbps, this system is ready to support your 4K/8K streaming, virtual reality gaming, and extensive file downloading without a hiccup.
- Multi-Device Support: With the capacity to handle 200+ devices, your smart home's plethora of gadgets will have robust connectivity, from smart TVs and gaming consoles to mobile phones and home automation devices.
Why We Recommend It:
The NETGEAR Orbi RBKE963 is more than just a router; it's a comprehensive WiFi solution designed for the modern, connected home. It's perfect for:
- Large homes where consistent coverage is a challenge.
- Tech-savvy households with numerous connected devices.
- Power users who need the utmost in speed and reliability for streaming, gaming, and telecommuting.
Ease of Use: Setting up the Orbi is a breeze with the Orbi app. Customize settings, manage your network, and enjoy peace of mind with built-in NETGEAR Armor™ cybersecurity that keeps your network safe.
Customer Satisfaction: Don't just take our word for it; customers rave about the Orbi's superior range and the elimination of buffering, ensuring smooth and enjoyable online experiences.
|

Optimal Selection: The Premier Standard Switch for Your Network

|
When it comes to expanding your home or office network, the NETGEAR 8-Port Gigabit Ethernet Unmanaged Switch (GS308) stands out as a reliable and straightforward solution. This compact, robust switch is engineered to cater to your diverse networking needs, providing a high-quality, easy-to-use, and cost-effective solution.
Key Features:
- 8 Gigabit Ports: Ample connectivity options with eight auto-sensing Gigabit Ethernet ports that provide fast, reliable network connections to your devices.
- Plug-and-Play: With a simple set up process, there’s no software to install or configuration needed—just connect your devices and start using them.
- Versatile Mounting Options: The switch's sleek metal case supports desktop or wall mount placement, ensuring it fits seamlessly into any workspace or home setup.
- Silent Operation: The fanless design ensures quiet operation, making it perfect for noise-sensitive environments.
Why We Recommend It: The NETGEAR GS308 switch is ideal for those who want to:
- Instantly expand their network for gaming, streaming, or home office use.
- Enjoy a high-speed wired connection for up to eight devices.
- Set up a network hassle-free, without the need for professional installation.
Durability and Performance: NETGEAR is known for its commitment to quality. The GS308 switch is built to last, with a sturdy metal case that protects the switch from accidental damage. It's also designed to optimize power usage, saving energy without compromising performance.
Customer Feedback: Users consistently praise the GS308 for its reliability and ease of use, noting the difference it makes in their network's performance and stability.
|

Top Pick for Expanded Networks: The Best Larger Switch for Superior Connectivity

|
Have more devices? No problem! Here is the same powerful switch with more space to add more devices to it |
Leading Ethernet Network Cards for Desktops: Enhancing Your Wired Connection

|
In the realm of network upgrades, the TP-Link TG-3468 stands as an exceptional choice for those seeking to enhance their desktop's connectivity. This Gigabit PCI Network Adapter is designed to provide high-speed internet access through a wired connection, ensuring your PC can handle the most bandwidth-intensive tasks without a hitch.
Key Features:
- High-Speed Ethernet: Enjoy 10/100/1000Mbps PCIe Adapter speeds, ensuring rapid data transfer, smoother streaming, and gaming without lag.
- Wide Compatibility: The TG-3468 fits into any standard PCI Express slot, including x1, x4, x8, or x16 configurations, making it a versatile addition to any desktop setup.
- Advanced Technology: With advanced IEEE 802.3x flow control, this network card provides efficient data processing to ensure your work and play are uninterrupted.
Why We Recommend It: The TP-Link TG-3468 is a perfect fit for users who:
- Require reliable high-speed internet access for online gaming, streaming 4K video content, and managing large file transfers.
- Need to upgrade or replace their desktop’s existing network card with a more powerful alternative.
- Want a cost-effective solution for enhancing their network without the need for extensive modifications.
Ease of Installation: Installing the TG-3468 is a breeze. It comes with an intuitive installation guide, and with its plug-and-play interface, you'll be up and running in no time. Plus, with support for Windows and Linux operating systems, compatibility is broad and convenient.
Customer Experience: Customers commend the TG-3468 for its reliability and straightforward installation process. It has been praised for its performance boost, particularly in situations where wireless connectivity is inconsistent or not available.
|

Top Ethernet Network Adapters for Laptops: Maximizing Your Mobile Connectivity

|
Take your laptop’s connectivity to new heights with the Anker USB C Hub Adapter, a versatile and sleek solution for expanding your MacBook or any USB-C-equipped laptop's port range. Designed to meet the demands of today's mobile professionals, this hub is a one-stop accessory for all your peripheral needs.
Key Features:
- Comprehensive Port Availability: Equipped with 2 USB-A ports, 1 HDMI port, a lightning-fast SD card reader, and a 60W Power Delivery USB-C port, this hub turns a single USB-C port into a powerhouse of productivity.
- 4K HDMI Display Support: The HDMI port provides media display with crystal clear resolution up to 4K at 30Hz, perfect for presentations, movie nights, or extending your desktop workspace.
- High-Speed Data Transfer: Transfer movies, photos, and music at speeds up to 5 Gbps via the USB-A and USB-C ports.
- Power Delivery Charging: Keep your laptop charged while using the hub with pass-through charging up to 60W, ensuring you stay powered up for all your tasks.
Why We Recommend It: The Anker USB C Hub Adapter is ideal for:
- MacBook users needing additional ports without sacrificing portability.
- Professionals who require a reliable connection for peripherals, from USB drives to monitors and everything in between.
- Anyone in need of a quick and efficient way to transfer data from SD cards or external storage devices.
Sleek Design and Portability: Its compact design makes it a perfect travel companion, easily fitting into any bag or pocket. The premium aluminum exterior is not only stylish but also aids in dissipating heat, keeping the hub cool during extended use.
Customer Insights: Users praise the Anker USB C Hub for its build quality, reliability, and ease of use. It's widely regarded as a must-have for MacBook users or anyone with a USB-C laptop looking to expand their connectivity options.
|

Cable Management Tools
Cord bundle protector

|
This protector not only safeguards your cables from damage but also consolidates multiple cords into one sleek sleeve, creating a tidy and organized appearance. |
Cord Cover Raceway

|
The cord raceway provides a simple solution to conceal multiple wires along a wall or a space, ensuring a clutter-free and visually pleasing space without the mess of visible cables. |
Cable Management Kit

|
Enhance your workspace's aesthetics and organization with this all-in-one cable management kit. It's designed to seamlessly gather and conceal cables, transforming cluttered bundles into a clean and streamlined arrangement. Ideal for your home office or entertainment center, this kit enables you to effortlessly route your wires, keeping them protected and out of sight for a neat and distraction-free environment. Say goodbye to the tangle of wires and enjoy the simplicity of a well-organized space. |
Consider Power Over Ethernet (PoE):
- PoE can be a convenient solution for powering devices like IP cameras, VoIP phones, and Wi-Fi access points, reducing the need for additional power outlets.
-
Plan for Future Upgrades:
- Choose equipment that allows for future expansion and upgrades. As technology advances, your network requirements might change.
Calculate Cable Length and Paths:
Measuring Cable Length:
Start by measuring the distance from your network hub (like a router or switch) to each device that will be connected via Ethernet. Use a measuring tape to trace the actual path the cable will take, considering any turns or obstacles. Remember, it's not just a straight line from point A to B.
It's crucial to measure the intended path along walls or through ceilings, as this gives a clearer picture of the cable needed. Don't forget to add some extra length to each measurement to accommodate unforeseen obstacles or changes in the layout, ensuring you have enough cable for the installation.
Buying Extra Cable:
It’s wise to purchase slightly more cable than your measurements indicate. This extra length can be useful for adjustments or future reconfigurations of your network. Having spare cable is also beneficial in case of mistakes during installation or when adding new devices.
Remember, it’s always better to have a little more cable than finding yourself short halfway through the installation. This foresight can prevent unnecessary delays and complications, making your setup process smoother and more efficient.
Best Cat 6 Cable: Essential for High-Speed Networking

|
Elevate your network's performance, this high-quality cable ensures stable and fast data transfer, perfect for home or office use. Its durable design and snagless connectors provide a secure, uninterrupted connection, making it an ideal choice for streaming, gaming, and other high-bandwidth activities. Upgrade your setup with this reliable and efficient networking solution. |
Cat 6 Cable Solutions for Large-Scale Networking Projects

|
Have a larger project with more cabling needs? No problem, this Cat 6 cable provides up to 1,000 ft of cable! per box
|
Top Pick: User-Friendly Ethernet Termination Tool for Effortless Setup

|
When using raw ethernet wire (for the larger cable needs) you will need to terminate the ends. This tool makes it easy to terminate your cables.
|
Best Cat 6 Keystone Jacks: Essential for Reliable Network Connections

|
The end jacks are also needed when using raw ethernet wire. This pack provides you the jacks needed to terminate the cables.
|
Planning Cable Routes:
- Decide whether the cables will run through walls, ceilings, or along baseboards. Each option has its considerations, such as the difficulty of installation and aesthetic impact.
- For wall or ceiling installations, you may need to consider factors like drilling holes and complying with building codes.
Avoiding Interference:
- When running cables, avoid close proximity to electrical wires to prevent interference.
- Use shielded cables if you must run Ethernet cables near potential sources of electrical interference.
Using Conduits and Raceways:
- In situations where cables will be visible, such as along baseboards, consider using conduits or raceways for a neater appearance and to protect the cables from damage.
Cord Cover Raceway
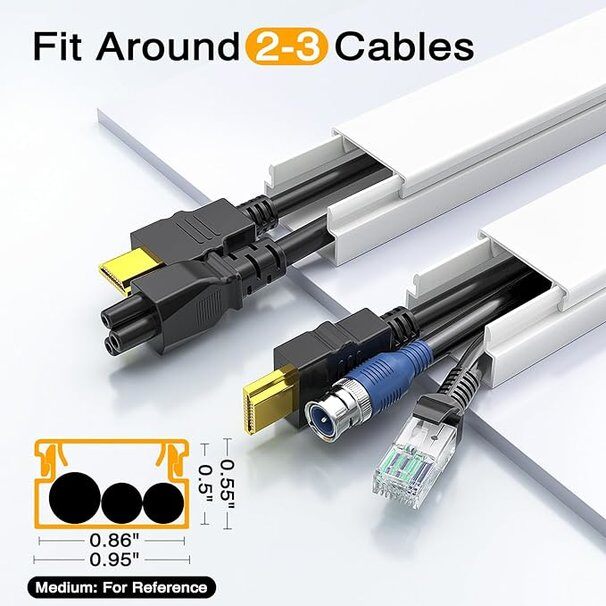 |
The cord raceway provides a simple solution to conceal multiple wires along a wall or a space, ensuring a clutter-free and visually pleasing space without the mess of visible cables.
|
Labeling and Organization:
- Label each cable at both ends for easy identification. This can save time and confusion during both installation and future troubleshooting.
- Use cable ties or velcro straps to bundle cables together neatly, especially in the server room or where multiple cables converge.
Top-Recommended Cord Labels for Efficient Cable Management

|
Organize and identify your cables effortlessly with these durable and easy-to-use labels come in various colors, making it a breeze to mark and distinguish between different cables and wires in your home or office setup. Ideal for electronics, computers, and general cable management, these labels are a must-have for anyone looking to streamline their cable organization.
|
Consider Upgradability and Future Proofing:
When setting up your internet network, think about what you might need in the future. As technology gets better, you might want to connect more gadgets or have faster internet. Here’s what to do:
Think About Future Needs:
- Imagine what new devices you might get later, like new phones, smart home gadgets, or faster computers.
- Also, think about if you might need quicker internet in the future, like for watching movies in super clear quality or playing online games without delays.
Pick Equipment That Can Grow With You:
- Choose internet equipment, like your router (the device that brings internet to your home), that can be easily upgraded. This means you can make it better or add more parts to it later, without buying a whole new one.
- Look for routers and switches (devices that connect different parts of your network) that can easily be changed or added to as you need more speed or connect more things to your internet.
This way, your internet setup is ready to grow with you and can handle new things you might want to do online in the future!
How Should Ethernet Wires Be Arranged According to Wiring Schemes?
When preparing an Ethernet cable for use, arranging the exposed wires correctly is vital to ensure the connection works flawlessly. This process involves following specific wiring standards, primarily T568A and T568B.
Understanding T568A and T568B Standards
The T568A and T568B are the two recognized wiring schemes for arranging the twisted pairs in Ethernet cables. These standards organize the copper wires by color, each corresponding to a specific pin location within the RJ-45 connector.
Step-by-Step Guide to Arranging Ethernet Wires
- Expose the Wires: Begin by stripping the cable to expose the individual wires. Make sure they remain untangled and straight.
- Identify the Colors:
- T568A Sequence: White/Green, Green, White/Orange, Blue, White/Blue, Orange, White/Brown, Brown.
- T568B Sequence: White/Orange, Orange, White/Green, Blue, White/Blue, Green, White/Brown, Brown.
- Align the Wires: Choose either the T568A or T568B configuration based on your network setup or existing connections. Ensure the wires are aligned in the correct sequence before insertion into the connector.
- Check Compatibility: Consistency is key. Use the same wiring scheme on both ends of the cable to avoid cross-wiring, unless specifically configuring for crossover purposes.
Remember, selecting the appropriate scheme will depend on your local regulations or specific infrastructure requirements. Often, T568B is more widely used in North America, while T568A is mandated for some government installations. Adjust your approach accordingly to meet network standards efficiently.
Safety and Compliance:
When setting up your Ethernet network, safety and adherence to local building codes are crucial. Here’s a guide to help you ensure that your installation is both safe and compliant:
Proper Electrical Grounding:
- Check that the outlets where you’ll plug in your network equipment, like routers and switches, are properly grounded. This means they should have a three-prong outlet, which helps prevent electrical shocks and protects your equipment.
- Grounding is important for the overall safety of your network and any electronic devices connected to it.
Use of Surge Protectors:
- Plug your network equipment into a surge protector. This device helps protect your equipment from sudden spikes in electrical power, which can happen during storms or power outages.
- A surge protector is especially important for delicate electronics and can help extend the life of your networking devices.
Adhering to Building Codes:
- When running Ethernet cables through walls, ceilings, or floors, it’s important to follow local building codes. These codes are in place to ensure safety and proper installation.
- Building codes can vary depending on your location, so it’s important to check with local authorities or a professional installer to understand the specific requirements in your area.
Considering Cable Types for Safety:
- Use the right type of cable for different parts of your home or office. For instance, plenum-rated cables are designed for spaces with air circulation and have higher fire-resistance, making them safer for certain areas.
Regular Inspections and Maintenance:
- Once your network is set up, periodically inspect cables and equipment to ensure they are in good condition and safely installed.
By focusing on safety and compliance, you not only protect your equipment but also ensure a reliable and safe network environment in your home or office. This approach helps in avoiding potential hazards and ensuring that your Ethernet installation meets all necessary safety standards and legal requirements.
How to Crimp Wires and Secure Wall Plates in Ethernet Installation
When setting up an Ethernet connection, crimping the wires and securing the wall plates are essential steps. Being meticulous during these tasks can help prevent connectivity issues and ensure a lasting installation. Here's how you can achieve this:
Step 1: Crimp the Wires
- Insert the Wires: Carefully place the wires into the RJ45 connector. Make sure each wire aligns with the appropriate slot in the connector according to the standard wiring diagram (either T568A or T568B).
- Use a Crimping Tool: Once the wires are in place, use a reliable crimping tool. Squeeze the handle firmly so the connector's pins penetrate each wire, creating a secure electrical connection.
- Ensure Strain Relief: Make sure the cable's outer jacket is held in place by the connector. This provides necessary strain relief and protects the wires from potential damage due to pulling or bending.
Step 2: Secure the Wall Plates
- Position the Wall Plates: Align the wall plates over the outlet openings carefully. Ensuring a neat fit is crucial to avoid damaging the cables.
- Attach Firmly: Secure the plates so they're affixed snugly, making sure the Ethernet cable inside the wall is not pinched or excessively bent. Proper placement ensures both functionality and aesthetics.
By following these steps, you can ensure a reliable and efficient Ethernet installation, minimizing issues and maximizing performance.
Do You Need a Permit to Install Ethernet?
When considering an Ethernet installation for your home or small office, you might wonder if a permit is needed. Generally, for most residential and small business setups, a permit isn't required. However, understanding the nuances can save you from potential headaches down the road.
Key Considerations
- Location Matters: The requirements can vary based on your local jurisdiction. In residential settings, permits are typically not necessary. Still, it's wise to double-check with your local building authority, especially if you're planning significant structural changes.
- Commercial Installations: For larger, commercial spaces, the rules may be stricter. Extensive networking tasks, such as running cables through walls or ceilings in office buildings, often involve more stringent guidelines.
- Building Type: If you reside in a historic building or an apartment with a homeowner's association, additional permissions might be mandatory.
Tips for Compliance
- Consult Local Codes: Contact your city or county building department to verify if any specific codes pertain to Ethernet installation.
- Professional Assessment: Hiring a certified electrician or network technician can ensure that your setup meets safety and regulatory standards.
- Document Everything: Keep records of any consultations and permits obtained, should you ever need proof of compliance.
By being proactive about these factors, you can install your Ethernet network smoothly and avoid possible complications.
Step-by-Step Ethernet Installation Guide
Step 1: Setting Up the Router
Central Placement:
- Position your router in a central location for optimal distribution of Ethernet cables throughout your home or office. This helps in reducing cable length and improving network efficiency.
- When starting your Ethernet installation, the placement of your router is a key first step. Here's how to do it effectively:
Finding the Ideal Central Location:
- Look for a spot in your home or office that is as central as possible. This helps in distributing Ethernet cables evenly to different areas.
- A central location minimizes the length of cables needed, leading to a cleaner setup and potentially lower costs.
Considering the Physical Layout:
- Think about the layout of your space. The central point should be easily accessible and preferably elevated to avoid potential physical obstructions.
- Avoid placing the router in a corner or a closet, as this can limit its effectiveness in distributing the network.
Accessibility for Cable Management:
- The chosen location should have easy access for running cables. If you plan to run cables through walls, ceilings, or floors, the router should be positioned near these access points.
- Ensure there’s enough space around the router for connecting and managing multiple Ethernet cables.
Reducing Cable Clutter:
- A central router location helps in managing cable runs more efficiently. Long cable runs can be difficult to manage and may require additional cable management solutions.
- Use cable organizers or conduits to keep cables tidy and prevent them from becoming trip hazards.
Enhancing Network Performance:
- The central placement of the router can lead to more efficient network performance. It ensures that the signal strength is consistent across different areas, especially if your router also provides Wi-Fi.
- It also helps in balancing the network load, ensuring stable connectivity for all connected devices.
- By carefully choosing the central location for your router, you lay a strong foundation for your Ethernet network. This placement not only aids in efficient cable distribution but also enhances overall network performance, making it a crucial step in setting up a reliable and effective Ethernet infrastructure in your home or office.
Connecting to Modem:
- Use an Ethernet cable to link the router to your modem, which is the gateway to internet access. Connect one end to the modem and the other to the WAN port on the router.
- The connection between your router and modem is a fundamental step in establishing your Ethernet network. Here's how to do it correctly:
1) Understanding the Modem-Router Connection:
- Your modem acts as the gateway to the internet, provided by your ISP (Internet Service Provider).
- The router distributes this internet connection to various devices in your network, either through Ethernet cables or Wi-Fi.
2) Making the Connection:
- Locate the WAN (Wide Area Network) port on your router. This is usually distinct from other ports and may be labeled as 'Internet' or 'WAN'.
- Plug one end of the Ethernet cable into the modem. Then, connect the other end to the WAN port on your router.
3) Ensuring Secure Connections:
- Check that the connectors on both ends of the Ethernet cable click into place securely. A loose connection can lead to intermittent or no internet access.
- Avoid bending the cable sharply or running it under heavy objects, as this can damage the cable and affect the quality of your connection.
4) Verifying the Connection:
- Once connected, most routers and modems will indicate a successful connection with a status light. Ensure these lights are on and stable.
- If your modem has a router or wireless function built-in, it's recommended to disable this feature to prevent network conflicts.
By properly connecting your router to the modem using an Ethernet cable, you're ensuring that your home or office network has a reliable and efficient internet source. This connection is essential for distributing internet access to all your devices, making it a crucial step in setting up your Ethernet network.
Optimize Router Position:
- Avoid placing your router near metal objects and electronic appliances to prevent signal interference. If your router also provides Wi-Fi, ensure it's in an open area for better wireless coverage.
- Properly positioning your router is crucial for both wired and wireless network performance. Here's how you can optimize its position:
1) Avoiding Interference:
- Keep your router away from metal objects and large electronic appliances like refrigerators or microwaves. These items can interfere with the router’s signal, especially if it’s also providing Wi-Fi.
- Other sources of interference can include cordless phones and Bluetooth devices, so consider their proximity when choosing a location.
2) Choosing an Open Area:
- If your router also broadcasts a Wi-Fi signal, placing it in an open area can help maximize wireless coverage. Avoid closets, cabinets, or enclosed spaces that can restrict signal range.
- The router should ideally be placed off the floor, on a shelf or a table, for better signal distribution.
3) Reducing Physical Obstructions:
- Physical barriers like walls, especially those made of concrete or brick, can weaken Wi-Fi signals. Position your router to minimize the number of walls it needs to pass through to reach your devices.
- For multi-story homes or offices, consider a central location on the vertical plane as well, such as on a middle floor.
4) Centralizing for Wired Connections:
- For Ethernet connections, a centrally located router can reduce the length of cable runs to various rooms or areas, making cable management easier and more efficient.
- This central placement also helps in providing an evenly distributed network setup, especially important in larger homes or office spaces.
5) Ensuring Accessibility:
- Place your router where it’s easily accessible for maintenance, troubleshooting, or to reset it. Avoid overly high or hard-to-reach areas.
- Also, ensure there’s enough space around the router for proper ventilation to prevent overheating.
By optimizing the position of your router, you enhance the effectiveness of both your Ethernet and Wi-Fi networks. This strategic placement can lead to improved network stability, coverage, and overall performance, making it an essential step in setting up an efficient home or office network.
Step 2: Running Ethernet Cables
What Tools Are Needed to Install Ethernet Cables?
Installing Ethernet cables requires a handful of essential tools to ensure that the process is smooth and the connections are reliable. Here's a detailed breakdown of the tools you'll need:
- Wire Cutters: These are crucial for cleanly cutting Ethernet cables to your desired length without fraying the ends.
- Wire Stripper: This tool carefully removes the protective coating from the cable, exposing the internal wires without causing any damage to them.
- Crimping Tool: You'll use this to securely attach RJ45 connectors to the ends of the cables, which is necessary for establishing effective network connections.
- Fish Tape: This tool is invaluable for pulling cables through tricky spaces like walls, ceilings, or crawl spaces, helping you manage longer cable runs effortlessly.
- Drill and Appropriate Drill Bits: A drill is necessary for creating entry and exit points through walls or other barriers. Ensure you're using the right size drill bit for the job.
- Stud Finder: To avoid accidentally drilling into support structures or electrical wiring hidden behind walls, a stud finder is essential.
- Patch Panel: If you're installing cables on a larger scale, such as in an office, a patch panel helps in organizing and managing multiple connections neatly.
- Ethernet Tester: Before concluding your installation, an Ethernet tester is important for verifying that each cable is wired correctly and functioning as expected.
By equipping yourself with these tools, you’ll enhance the efficiency of your Ethernet cable installation, reduce the risk of errors, and ensure a high-quality network setup.
In-Wall Installation:
Running Ethernet cables through walls is a common method to achieve a cleaner, more permanent setup, particularly in larger homes or offices. This approach not only ensures connectivity throughout the premises but also enhances the aesthetic appeal by reducing visible cable clutter.
Here's how to approach in-wall Ethernet cable installation:
1) Professional Installation:
2) Planning the Cable Routes:
- Before installation, plan out the route for each cable. This involves deciding where the cables will enter and exit the walls and how they will run between different rooms or floors.
- Consider the locations of your router, connected devices, and any network switches or additional hardware.
3) Aesthetic Considerations:
- In-wall cabling offers a more aesthetically pleasing look as it hides cables from view. This can be especially important in spaces where appearance is key, like living areas or customer-facing business environments.
- Ensure that wall plates and outlet covers match your room's aesthetics for a seamless look.
4) Avoiding Interference:
- When planning the route, avoid running Ethernet cables parallel to power lines for long distances to prevent electromagnetic interference.
- Use shielded Ethernet cables if proximity to power lines can't be avoided.
5) Access Points and Outlets:
- Decide on the locations for Ethernet outlets – these are the points where you’ll plug in devices or patch cables leading to devices. Outlets should be conveniently located near where you'll use the connected devices but also consider future changes in room layout.
- Ensure that outlets are easily accessible for maintenance and reconfiguration of your network setup.
6) Safety and Compliance:
- Running cables through walls must comply with local building and fire safety codes. This often involves using specific types of cables, such as plenum-rated cables, in certain areas of a building.
- A professional installer will be familiar with these requirements and ensure that your installation is both safe and compliant.
By opting for in-wall Ethernet cable installation, you're choosing a solution that not only enhances the look and feel of your space but also provides a secure and organized network infrastructure. This method is ideal for those who prefer a minimalistic approach to cable management and wish to maintain the aesthetic appeal of their environment.
External Routing:
If in-wall cabling isn’t an option, use cable clips to neatly run cables along baseboards or walls. This method is simpler and can be a DIY project. Ensure cables are secured and not a tripping hazard. If installing Ethernet cables inside walls isn't feasible, external routing is a practical alternative. This approach involves running cables along baseboards, walls, or ceilings. Here's how to do it effectively:
Planning the Cable Path
- Map out the path your Ethernet cables will take. Consider the shortest and most direct route from the router to each device, while minimizing the visibility and impact on room aesthetics.
- Pay attention to doorways, corners, and any obstacles that might require additional cable management solutions.
Using Cable Clips for Secure Installation
- Cable clips are an essential tool for external routing. They help secure the cables against walls or baseboards and prevent them from hanging loose.
- Position the clips at regular intervals to keep the cables straight and neatly aligned. This not only looks better but also prevents damage to the cables.
Avoiding Tripping Hazards
- Run cables along edges or corners where they are less likely to be a tripping hazard. Avoid running cables across walkways or high-traffic areas.
- If you must cross a walkway, consider using cable covers or raceways that protect the cables and reduce the risk of tripping.
Maintaining Cable Integrity
- Avoid bending the cables sharply or pinching them, as this can damage the internal wiring and impair network performance.
- When running cables around corners, allow for a gentle curve rather than a tight bend.
Aesthetic Considerations
- Choose cable colors that blend with your walls or baseboards for a more discreet look.
- If the cables are still too visible, paintable cable ducts can be used to conceal them while matching the room's decor.
Accessible and Adaptable
- One advantage of external routing is the ease of access for future changes or troubleshooting. Unlike in-wall installations, you can easily add, remove, or replace cables.
- Keep some extra length of cable hidden near the router or device ends to allow for repositioning of furniture or equipment.
DIY-Friendly Approach
- External cable routing is a project that many people can do themselves. With basic tools like a measuring tape, cable clips, and a drill or hammer for installing the clips, you can complete this project without the need for professional help.
External routing of Ethernet cables is a straightforward and flexible option for those who prefer a do-it-yourself approach or when in-wall installation is not suitable. By carefully planning the cable path and securing the cables neatly, you can achieve a functional and tidy network setup without the complexities of in-wall cabling.
However, before diving into this DIY project, it's crucial to ensure you have the right tools and a basic understanding of wiring principles. Here are a few key considerations to keep in mind:
- Tools Required: Make sure you have essential tools like a cable tester, crimping tool, and appropriate connectors.
- Safety First: Always adhere to safety guidelines to prevent any potential hazards. Planning your route and ensuring cables are secured properly can help maintain a safe environment.
- Understanding the Basics: Familiarize yourself with the basic wiring principles to ensure a successful installation.
By combining careful planning with the right preparation, you can effectively set up your Ethernet network without professional help, all while maintaining a safe and organized workspace.
How to Cut, Strip, and Separate Ethernet Wires
Step 1: Measure and Cut
Begin by measuring the distance required for your Ethernet cable installation and then cut the cable to the necessary length using wire cutters. Ensuring that your measurement is precise will help minimize waste and avoid future connection issues.
Step 2: Stripping the Cable
Now, take a wire stripper and gently remove about an inch of the outer insulation from each end of the Ethernet cable. This step is crucial to reveal the internal wires, yet you must handle it with care to prevent damaging the wires beneath. Brands like Klein Tools or Irwin make excellent wire strippers that can get the job done efficiently.
Step 3: Separating and Untwisting the Wires
After stripping, look inside to find the twisted pairs of wires. Carefully separate and untwist these pairs, ensuring that each wire is fully untangled and ready for alignment in connector fittings. This process is key to setting up a reliable connection.
Final Check
Before moving on to the next installation phase, you should check each wire for any nicks or cuts that may have occurred during the stripping and untwisting process. This helps guarantee a stable and efficient data transmission.
Step 3: Connecting Devices
- Making Connections: Connect one end of an Ethernet cable into the router and the other end into the Ethernet port of your device (like a computer or smart TV).
- Secure Connections: Ensure that all connections are firm and secure to prevent loose cables, which can lead to connectivity issues.
Connecting your devices to the router using Ethernet cables that you selected during the “Planning Your Ethernet Installation” section is a straightforward but essential part of setting up your network.
1) Identifying the Ethernet Port:
- Locate the Ethernet port on your device. This port looks like a larger telephone jack and is commonly found on the back of desktop computers, laptops, smart TVs, gaming consoles, and some other network-enabled devices.
- If your device does not have an Ethernet port (like many modern laptops), you may need an adapter or a docking station that provides an Ethernet connection.
2) Connecting to the Router:
- Plug one end of the Ethernet cable into one of the available LAN (Local Area Network) ports on the router. These ports are typically grouped together and are separate from the WAN port used to connect to the modem.
- Insert the other end of the cable into the Ethernet port on your device. Ensure the connector clicks into place for a secure connection.
3) Ensuring Secure Connections:
- Double-check that the Ethernet cables are firmly plugged in at both ends. Loose connections can cause intermittent or no connectivity issues.
- Avoid forcing the connector into the port, as this can damage the port or the cable.
4) Managing Cable Layout:
- If you are connecting multiple devices, organize the cables neatly to prevent tangling and to maintain an orderly setup. Use cable ties or clips to bundle cables together if necessary.
- Labeling each cable at both ends can also help you identify which cable goes to which device, simplifying troubleshooting and maintenance.
5) Testing the Connection:
- Once connected, check your device for network connectivity. This can usually be done by opening a web browser and trying to access a website.
- If the device does not connect, recheck the connections, and ensure that the router is powered on and functioning correctly.
Connecting devices with Ethernet cables provides a stable and fast network connection, ideal for high-bandwidth activities like streaming, gaming, or transferring large files. By following these steps, you can ensure that your devices are properly connected to your network, enabling reliable and efficient communication within your Ethernet setup.
Step 4: Configuring Your Network
- Configuring your router is a critical step in setting up your Ethernet network. It involves customizing settings to suit your specific needs and enhance network security. Here’s how to approach it:
1) Accessing Router Settings:
- To configure your router, you need to access its settings page. This is usually done through a web browser.
- Enter the router's IP address into the browser's address bar. The IP address is often found on the back of the router or in the manual. Common addresses are 192.168.1.1 or 192.168.0.1.
2) Setting Up Network Name and Password:
- Once logged in, you can set up your network's name, known as SSID (Service Set Identifier). Choose a name that is unique and recognizable but avoid personal information for security reasons.
- Set a strong password for your Wi-Fi network (if your router provides Wi-Fi) to prevent unauthorized access. Use a combination of letters, numbers, and symbols for the best security.
3) Configuring Advanced Settings:
- Set up guest networks if your router supports them. This allows visitors to use your internet without giving access to your main network, enhancing security.
- Implement parental controls to manage internet access for children, restricting access to inappropriate content or setting time limits on usage.
4) Quality of Service (QoS) Settings:
- QoS is a feature that prioritizes certain types of network traffic. For example, you can prioritize video streaming or online gaming to ensure a smoother experience.
- Adjusting QoS settings can be especially useful in a busy network environment to maintain performance where it matters most.
5) Firewall and Security Settings:
- Most routers have built-in firewalls. Ensure the firewall is activated to protect your network from external threats.
- Regularly update your router's firmware to the latest version to keep security features up-to-date and to patch any vulnerabilities.
6) Saving and Testing Settings:
- After configuring your settings, save them and reboot the router if necessary.
- Test the network to ensure your configurations are working as expected. This can be done by connecting a device to the network and checking connectivity and performance.
Expanding Network Coverage and Device Configuration:
- With your router and modem connected, ensure each floor or room in your home or office is adequately covered. This involves connecting them to designated jacks or using Wi-Fi extenders if necessary for wider coverage.
- Now, configure the network settings on each computer to ensure they recognize the new connections. This may involve adjusting IP addresses or DNS settings. For wireless devices, ensure they are seamlessly integrated into the network by connecting them to the correct Wi-Fi SSID and entering the network password.
Router configuration is crucial in creating a secure and efficient network. By taking the time to properly set up and customize your router settings, you can ensure a safe, fast, and reliable network experience for all users. This step is key to maintaining the overall health and functionality of your home or office network.
Step 5: Testing Your Connection
After setting up your Ethernet network, it's important to test the connection to ensure it's functioning correctly and providing the expected performance. Here's how to conduct a thorough check:
1) Testing Ethernet Cables with Equipment:
- Use a network tester to examine each Ethernet cable. This device checks for continuity, ensuring that the cable connections are complete and uninterrupted.
- Verify proper signal strength and scan for any possible interference, essential for maintaining a stable connection across your network.
2) Conducting a Speed Test:
- Use online speed test tools to measure the speed of your network. These tools can be accessed through a web browser and are simple to use.
- Check both download and upload speeds to ensure they align with what your Internet Service Provider (ISP) has promised. Common speed test websites include Speedtest.net, Fast.com, and others.
3) Interpreting Speed Test Results:
- The results will show your network’s download and upload speeds in Mbps (megabits per second). Compare these to your ISP’s advertised speeds for your plan.
- Remember that speeds can vary slightly due to network congestion, the time of day, and the server location of the speed test.
4) Testing Different Devices:
- Conduct speed tests on various devices connected to your network to ensure consistent performance across all of them.
- If one device is significantly slower, it could be an issue with the device itself, its network adapter, or the Ethernet cable used.
5) Stability Check:
- Monitor your network's performance over several days. This helps you assess its stability and reliability.
- Look for consistent connection speeds and observe how quickly your network recovers from any temporary disruptions or slowdowns.
6) Checking for Connectivity Issues:
- If you experience intermittent drops or connectivity issues, recheck your Ethernet connections, router settings, and cables for any faults.
- Sometimes resetting your router and modem can resolve temporary glitches.
7) Ensuring Proper Connection at All Points:
- Ensure every connection point from the router to each PC and other devices, like VoIP phones or conference equipment in meeting rooms, works correctly. This ensures your network infrastructure performs optimally across all intended locations.
8) Seeking Professional Help if Needed:
- If you continue to experience issues despite troubleshooting, consider consulting with a networking professional or your ISP. There might be deeper issues with your network setup or hardware that need expert attention.
Testing your connection is a vital step in ensuring your Ethernet network is not only up and running but also performing optimally. Regular checks and monitoring can help you maintain a reliable and efficient network, providing a seamless online experience for all users.
How to Thoroughly Evaluate Installation and Conduct Cleanup
Ensuring a successful network installation involves a few crucial steps to verify everything is in place and functioning correctly.
Step 1: Comprehensive Evaluation
Begin by inspecting all installed components. Ensure that everything, from the jacks to wall studs, is firmly installed. Look for potential issues such as exposed cables, particularly around small holes or areas where there might be movement, like on the floor.
Checklist for Evaluation:
- Verify all connections are tight and secure.
- Ensure no cables are visible or at risk of being pinched or damaged.
- Confirm that all hardware is installed correctly without gaps or loose attachments.
Step 2: Test Connectivity Across Devices
To ensure robust performance, test the network on various devices. This will help confirm consistent connectivity and smooth operation across the board.
- Testing Tips:Use smartphones, tablets, and laptops to test the network.
- Check for any lag or connectivity issues.
- Monitor signal strength to ensure it meets expectations throughout the space.
Step 3: Perform a Thorough Cleanup
After installation and testing, clean the work area meticulously. This includes removing any debris generated during drilling or setup. Ensuring that no remnants are left behind contributes to a safe and tidy environment.
- Cleanup Steps:Sweep or vacuum to eliminate dust and residual materials.
- Secure loose wires to prevent potential hazards and maintain a clean appearance.
By following these steps, you not only ensure a successful installation but also maintain the functional and aesthetic quality of your space.
How to Insert Wires into an RJ45 Socket Head
Inserting wires into an RJ45 socket head is a precise task that requires close attention to detail. Here's a clear and structured guide to assist you:
1. Prepare the Tools and Materials
- RJ45 socket head: Ensure you have the correct category (e.g., Cat5, Cat6).
- Wire stripper: For removing the outer jacket of the Ethernet cable.
- Crimping tool: Essential for securing the connection.
2. Strip the Cable
Carefully use the wire stripper to remove about 1-2 inches of the outer insulation from the Ethernet cable. This will reveal the twisted pairs inside.
3. Organize the Wires
Untwist the pairs and align them according to the required wiring standard. You'll typically use either the T568A or T568B standard. Here’s a quick reference:
T568A Standard:
- White/Green
- Green
- White/Orange
- Blue
- White/Blue
- Orange
- White/Brown
- Brown
T568B Standard:
- White/Orange
- Orange
- White/Green
- Blue
- White/Blue
- Green
- White/Brown
- Brown
4. Trim the Wires
Once organized, trim the wires evenly to ensure they fit entirely into the socket head without excess exposure.
5. Insert the Wires
Gently guide the wires into the socket head slots, ensuring they remain in the correct order. Push them until they reach the end of the head securely.
6. Crimp the Connection
Place the inserted socket head into the crimping tool. Firmly compress the tool to lock the wires into place, creating a solid and secure connection.
Final Check
After crimping, double-check to ensure each wire remains in order and is held tightly within the RJ45 socket head. Any discrepancies or loose wires can lead to connectivity issues.
Following these steps provides a reliable and professional-quality RJ45 connection, essential for maintaining network performance.
Advanced Tips and Troubleshooting for Ethernet Installation
Once your Ethernet network is set up, it's important to manage and maintain it effectively. Here are advanced tips and troubleshooting strategies to ensure optimal performance:
- Cable Management:Utilize cable organizers, such as velcro ties, cable sleeves, or conduits, to keep Ethernet cables neatly bundled and organized. This not only improves the appearance of your setup but also prevents tangling and damage to the cables
- Label each cable at both ends. This makes it easier to identify which cable goes where, simplifying any future changes or troubleshooting
- For in-wall installations, ensure that cables are properly secured and protected within the wall to prevent damage
- Upgrading Firmware:Regularly check for and install firmware updates for your router. Manufacturers release updates to improve security, add features, and enhance performance.
- Updating the firmware can often resolve connectivity issues and improve network stability. The process usually involves logging into the router's web interface and following the update instructions.
- Troubleshooting Connection Issues:If you encounter network issues, start by checking all physical connections. Ensure that Ethernet cables are firmly plugged in and undamaged.
- Restart your router and modem. This can often resolve temporary network glitches.
- Test different devices to see if the issue is isolated to a single device or is network-wide. This can help narrow down the source of the problem.
- Network Speed and Stability Checks:If you experience slow speeds or intermittent drops, use online speed test tools to check if your network is performing as expected.
- For Wi-Fi issues, consider the router's placement, and avoid interference from other electronics or physical obstructions.
- Regular Network Maintenance:Conduct regular maintenance checks on your network. This includes checking the status of your cables, ensuring your firmware is up to date, and monitoring the network’s performance.
- Keep track of any changes in your network setup or usage patterns, as these can sometimes impact performance or introduce new challenges.
These advanced tips and employing effective troubleshooting methods, you can maintain a robust, efficient, and reliable Ethernet network. Regular maintenance and updates, along with proper cable management, play a crucial role in the long-term health and performance of your network, ensuring a seamless connectivity experience in your home or office.
Ethernet installation can significantly enhance your networking experience in both homes and small businesses. By following this guide, you're equipped to make informed decisions and execute a successful Ethernet setup. Remember, a reliable network is not just about high speeds; it's about creating a stable and secure environment for all your connectivity needs.
For more detailed information and personalized advice, don’t hesitate to contact TekDash, your trusted partner in ethernet cable installer. We’re here to assist you with all your networking needs, ensuring you stay connected in today’s fast-paced digital world.
Planning Ethernet or structured cabling in Phoenix? TekDash can help with Ethernet cable installation in Phoenix and Phoenix structured cabling for homes, offices, and small business networks.


