A reliable Wi-Fi network is important for homes and businesses today. It allows for video calls, streaming, online gaming, and smart home features. Yet, Wi-Fi installation of a network can feel overwhelming for those who aren't tech-savvy. In fact, a recent study from Pew Research Center, found that 30% of Americans report experiencing problems connecting to the internet at home, highlighting the widespread challenges people face with Wi-Fi setup reliability and coverage.
This guide breaks down Wi-Fi installation and setup into simple steps, ensuring you have the knowledge to create a fast, secure, and efficient wireless network. Whether you’re dealing with dead zones, slow speeds, or complex layouts, we’ve got you covered!
Understanding Wi-Fi and Why It Matters
What Is Wi-Fi?
Wi-Fi is a wireless technology. It lets devices like smartphones, laptops, and smart home gadgets connect to the internet without the need for physical cables. It works by transmitting data through radio waves from a router connected to your internet service provider.
Why Is Proper Installation Important?
A properly installed Wi-Fi network ensures strong signal strength, wide coverage, and secure connections. Poor setup, on the other hand, can result in dead zones, slow speeds, and even security vulnerabilities.
Getting Started: What You’ll Need for Wi-Fi Installation
Essential Equipment for Wi-Fi Setup
To install a Wi-Fi network, you’ll need:
- Modem: Converts your internet provider's signal into a usable connection (typically provided by your internet provider).
- Router: Distributes the internet wirelessly or via Ethernet cables.
- Ethernet Cables: For connecting devices directly to the router or modem.
- Optional Equipment: Wi-Fi extenders, mesh systems, or additional access points for larger spaces.
Choosing the Right Wi-Fi Router Setup
Selecting the right Wi-Fi router setup is crucial to ensure your Wi-Fi network provides fast speeds, reliable coverage, and the capacity to handle all your connected devices. Here’s how to choose the best router based on your specific needs:
1. Opt for Wi-Fi 6 or Wi-Fi 6E Routers
Wi-Fi 6 and Wi-Fi 6E are the latest standards in wireless technology, offering:
- Faster Speeds: Up to 9.6 Gbps, which is significantly higher than older Wi-Fi 5 routers.
- Improved Efficiency: Ideal for homes and businesses with multiple devices like smartphones, laptops, TVs, and IoT devices.
- Lower Latency: Great for activities like online gaming and video conferencing.
- Better Device Management: Handles multiple connected devices simultaneously without slowing down.
When to Choose Wi-Fi 6E
Wi-Fi 6E routers are made for places with a lot of internet use. They have an extra 6GHz band to reduce interference. This is ideal for large households, offices, or anyone looking to future-proof their network.
Recommended Router
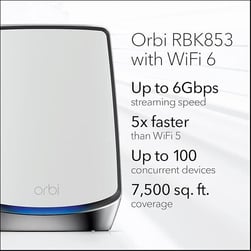
Netgear Orbi Wi-Fi 6E Mesh System
For most homes or small businesses, we suggest the Netgear Orbi Wi-Fi 6E Mesh System. It offers speed, coverage, and ease of use all in one package. Its tri-band technology ensures smooth performance even with dozens of connected devices.
2. Consider Mesh Systems for Wi-Fi Installation of Larger Spaces
If you live in a large home (over 2,500 square feet) or manage a business in a multi-floor building, a single router may not provide sufficient coverage. In such cases:
- Mesh Wi-Fi Router Setup Systems: These include multiple units (a base router and satellite nodes) that work together to blanket your space in seamless Wi-Fi.
- Mesh Wi-Fi router setup systems like Eero Pro 6 or Google Nest Wi-Fi are user-friendly and eliminate dead zones.
- Ideal for homes with thick walls, basements, or outdoor areas requiring connectivity.
- Routers with Extended Range: If you prefer a single device solution, look for routers with advanced antennas or beamforming technology for extended coverage.
When to Choose a Mesh System
Choose a mesh system when you need Wi-Fi coverage across multiple floors or in areas far from the central router location. Mesh nodes ensure a consistent signal without the drop-offs you’d experience with traditional range extenders.
We recommend the Netgear Orbi Wi-Fi router. It is a mesh system. You can easily add more wireless satellites to cover your whole area.
3. Small Business Wi-Fi Installation Network Needs: Advanced Security and Connectivity
Small businesses often have unique requirements that go beyond what a standard home router can provide:
- Additional LAN Ports: Essential for connecting devices like printers, desktops, or VoIP phones that require wired connections.
- Built-in VPN Capabilities: Protect sensitive data by encrypting remote access to your network.
- Advanced Security Features: Look for routers with built-in firewalls, malware protection, and support for WPA3 encryption.
- Prioritization Features (QoS): Quality of Service (QoS) settings let you prioritize bandwidth for critical tasks like video conferencing or file uploads.
Recommended Router for Small Businesses
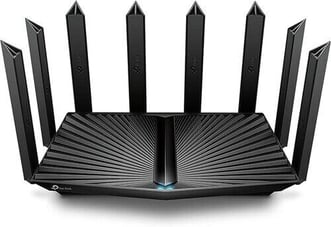
TP-Link Archer AX6000
The TP-Link Archer AX6000 is a great choice. It offers strong performance and many LAN ports. It also has advanced security features, making it perfect for small offices.
4. Wi-Fi Installation Budget Considerations
Routers vary widely in price, so it’s important to choose one that fits your needs and budget:
- Basic Routers ($50-$100): Suitable for smaller apartments with a few connected devices.
- Mid-Range Routers ($100-$300): Ideal for families or small businesses with moderate device usage.
- High-End Routers ($300+): Best for large homes, advanced gamers, or offices with heavy network demands.
By understanding your space, device needs, and usage patterns, you can select a router that keeps your network running smoothly. If you’re unsure what to choose, TekDash can help you assess your requirements and recommend the perfect solution!
Step-by-Step Guide to Wi-Fi Setup
Step 1: Connect Your Hardware
- Plug your modem into a power outlet and connect it to the wall jack using the cable provided by your internet service provider (ISP).
- Use an Ethernet cable to connect the modem to your router.
- Power on the router and wait for the indicator lights to stabilize.
Step 2: Access and Configure Your Router
- Open a web browser and enter the router’s IP address (typically printed on the device or in its manual most popular is 192.168.1.1).
- Log in using the default username and password (change these for security).
- Set a unique Network Name (SSID) and a strong password.
- Enable WPA3 encryption for the best security.
Step 3: Position Your Router
Proper router placement is one of the most important factors in ensuring strong, reliable Wi-Fi coverage throughout your home or business. Here’s how to position your router effectively:
Place the Router in a Central Location
- Why It Matters: Wi-Fi signals radiate outward from the router like ripples in a pond. Positioning the router in the center of your space helps distribute the signal more evenly across all areas.
- Ideal Locations:For homes: Place the router on the main floor and as close to the center of the home as possible.
- For businesses: Place it in an open area, away from enclosed offices or storage rooms.
- Avoid placing the router in a corner of the building, as this can cause one side of the space to have poor signal strength.
Keep the Router Elevated
- Why It Matters: Wi-Fi signals travel better when the router is elevated off the ground. Positioning it on a shelf, table, or mounted on a wall can significantly improve coverage.
- Pro Tip: Avoid placing the router inside cabinets or behind furniture, as this can block the signal.
Avoid Obstructions and Interference
Certain materials and devices can weaken Wi-Fi signals. To minimize interference:
- Avoid Thick Walls: Materials like brick, concrete, and stone can block signals. If your router must be near such walls, consider adding a Wi-Fi extender or a mesh system to improve coverage.
- Stay Away from Metal Surfaces: Metal objects, like filing cabinets or refrigerators, can reflect Wi-Fi signals and create dead zones.
- Keep Away from Other Electronics: Devices like microwaves, baby monitors, cordless phones, and Bluetooth devices can interfere with the router’s signal. Place the router at least a few feet away from such devices.
Consider the Layout of Your Space
- Multi-Story Homes or Buildings: If you live in a multi-story home, placing the router on the middle floor can help ensure even signal coverage upstairs and downstairs. For even better performance, consider a mesh system or additional access points.
- Large Spaces or Outbuildings: If you have a large property or detached structures, place the router as close as possible to the area you need coverage. You may also need extenders or wired access points to reach these areas effectively.
Testing Wi-Fi Installation Signal Strength
After positioning your router, use a Wi-Fi analyzer app or your device’s signal strength indicator to check coverage in all key areas. If you find weak spots, consider adjusting the router’s position or adding extenders.
By taking the time to position your router correctly, you can maximize your Wi-Fi setup network’s performance and minimize frustrating dead zones in your space. If you’re unsure where to place your router, TekDash professionals can help you assess and optimize your network layout and properly setup your wi-fi installation!
Step 4: Test Your Network
- Use a device to connect to the network and verify its speed and reliability.
- Use a tool such as SpeedTest to test the speed of your internet on your device to make sure you are getting the expected speeds.
- If you notice any dead zones, consider adding extenders or repositioning the router.
Where Can You Install Wi-Fi?
Wi-Fi can be installed in most residential and business environments, but the layout and materials in your space can impact its performance.
Good Layouts for Wi-Fi
- Open Floor Plans: Wi-Fi signals travel more effectively in spaces with fewer walls and obstructions.
- Centralized Router Placement: Positioning the router in the middle of your home or office ensures more even signal distribution.
- One-Story Buildings: Single-story layouts allow signals to travel farther without interference.
Where Wi-Fi Can Lack
- Multi-Story Homes: Wi-Fi signals weaken as they pass through floors.
- Thick Walls and Obstructions: Materials like brick, concrete, or metal can block signals.
- Large Spaces: Homes or offices over 2,500 square feet often have dead zones.
The Solution: Hardwiring Key Locations
Wi-Fi is a convenient and versatile technology, but it’s not without its limitations. In certain areas of your home or office, Wi-Fi signals may struggle to provide consistent performance due to obstacles, interference, or the distance from the router. For these challenging situations, hardwiring key locations can significantly improve your network’s reliability and speed. Here’s how and when to use this solution effectively.
Why Hardwired Ethernet Connections Are Important
Hardwiring specific devices to your network with Ethernet cable installation offers several key benefits:
- Faster Speeds: Ethernet connections provide higher and more stable speeds compared to Wi-Fi, making them ideal for devices that handle large data transfers, such as gaming consoles, desktop computers, or smart TVs.
- Improved Reliability: Wired connections are unaffected by interference from walls, other electronics, or neighboring Wi-Fi networks, ensuring a consistent experience.
- Reduced Wi-Fi Congestion: By connecting high-bandwidth devices to Ethernet, you free up Wi-Fi bandwidth for wireless devices like smartphones and tablets.
Devices and Areas That Benefit from Hardwired Connections
Hardwiring is particularly beneficial for:
- Home Offices: Desktop computers and workstations need a reliable connection for video calls, file sharing, and remote work.
- Entertainment Centers: Smart TVs, streaming devices, and gaming consoles perform better with a wired connection, eliminating buffering and lag.
- Workshops or Garages: Spaces far from the router often have weak Wi-Fi signals; Ethernet cables can deliver a strong connection directly to these areas.
- IoT Hubs: Smart home devices like security cameras and home automation systems benefit from stable, always-on wired connections.
How to Hardwire Key Locations
- Run Ethernet Cables: Use high-quality Cat 6 or Cat 7 cables for speeds up to 10 Gbps. Plan the cable routes carefully to minimize drilling and avoid unsightly wires.
- Use cable covers or wall-mounted conduits to keep installations tidy.
- Consider running cables through walls or ceilings for a cleaner look.
- Install Ethernet Ports: Place Ethernet jacks in strategic locations such as offices, entertainment rooms, or high-traffic areas where devices are frequently used.
- Connect Devices: Use short Ethernet cables to connect devices to the newly installed ports for seamless access to high-speed internet.
Installing Wired Access Points for Better Wi-Fi Coverage
In addition to hardwiring devices, installing wired access points can extend Wi-Fi coverage into areas where the signal is weak or nonexistent:
- What Are Wired Access Points? These devices connect to your router via Ethernet and broadcast a new Wi-Fi signal, essentially creating a secondary hotspot. This is perfect for extending coverage to basements, garages, or large outdoor areas.
- When to Use Wired Access Points:If Wi-Fi extenders or mesh systems fail to provide sufficient coverage.
- In spaces with thick walls or significant interference that reduce signal strength.
- For multi-floor homes or large offices where a single router struggles to reach all areas.
- How to Set Up Wired Access Points:Run Ethernet cables from your router to the desired location.
- Connect the access point and configure it to work with your existing network.
- Test the coverage and adjust placement if needed.
When to Combine Wired and Wireless Solutions
For the best overall network performance, many homes and businesses benefit from a combination of hardwired and wireless setups:
- Hybrid Approach: Use Ethernet for high-priority devices and wired access points, while maintaining Wi-Fi for mobile devices.
- Future-Proof Your Network: Installing Ethernet cables during renovations or new construction can save time and money if you expand your network later.
Key Considerations for Hardwiring
- Budget: While hardwiring can be an upfront investment, it’s a long-term solution that eliminates the need for additional extenders or mesh systems.
- Professional Installation: If you’re unfamiliar with running Ethernet cables or installing ports, consider hiring professionals like TekDash to handle the installation for you.
- Cable Quality: Choose high-quality cables (Cat 6 or higher) to ensure compatibility with future technologies.
By hardwiring key locations in your home or business, you can address weak Wi-Fi signals, improve overall network reliability, and create a seamless internet experience. Whether you’re streaming, working, or gaming, a combination of wired and wireless solutions ensures you get the most out of your network. If you need help with home or business Wi-Fi setup services or installing Ethernet connections, TekDash is here to help!
Setting Up Hardwired Access Points for Better Coverage
Why Hardwiring Access Points Works
While extenders and mesh systems help improve Wi-Fi coverage, hardwired access points offer unmatched reliability and speed. These are especially effective in:
- Multi-story homes.
- Buildings with thick walls.
- Outdoor areas requiring connectivity.
How to Install Wired Access Points
- Plan Ethernet Cable Routes: Identify where coverage is weak and run Ethernet cables to those areas.
- Install Access Points: These devices connect to your router via Ethernet and broadcast a strong Wi-Fi signal.
- Test the Coverage: Ensure that the new access points eliminate dead zones and provide consistent speeds.
Enhancing Your Wi-Fi Network and Wi-Fi Installation
Setting Up Wi-Fi Extenders or Mesh Systems
- Use extenders to boost signals in specific areas.
- Consider mesh systems for seamless coverage across large spaces or multiple floors.
Troubleshooting Common Wi-Fi Issues
Slow Internet Speeds
- Update your router's firmware.
- Check your ISP's service for outages or speed issues.
- Switch to a less crowded Wi-Fi channel.
Spotty Coverage
- Reposition your router for better signal distribution.
- Add range extenders or mesh nodes as needed.
Device Connectivity Problems
- Restart devices or reset their network settings.
- Assign static IPs to avoid conflicts.
Why Choose Professional Home Wi-Fi Setup Services
Setting up a Wi-Fi network may sound simple, but technical challenges can arise, especially in complex layouts or larger spaces. TekDash offers professional home Wi-Fi setup services to:
- Ensure optimal router placement.
- Install and configure access points for hard-to-reach areas.
- Provide customized solutions for homes and businesses of any size to get the maximum coverage and speeds in your space.

Bonus Tips for Maintaining a Strong Wi-Fi Network
Setting up a Wi-Fi network is just the first step. To ensure your network remains fast, reliable, and secure, regular maintenance and proactive management are essential. Here are some important tips for maintaining a strong Wi-Fi network that will keep your devices running smoothly and your data safe.
1. Regularly Update Your Router’s Firmware
Why It’s Important:
Firmware is the software that controls your router's functions. Manufacturers release firmware updates to improve performance, add new features, and fix security vulnerabilities. Outdated firmware can leave your network exposed to cyberattacks or cause your router to perform inefficiently.
How to Do It:
- Log into your router’s admin panel using its IP address (often printed on the router or in the user manual).
- Check for firmware updates under the settings or administration section.
- If updates are available, follow the on-screen instructions to download and install them.
- Enable automatic updates if your router supports this feature to stay protected without needing to check manually.
2. Create Guest Networks for Visitors
Why It’s Important:
Allowing guests to connect to your main Wi-Fi network can overload bandwidth and compromise security. A guest network provides a separate connection for visitors, ensuring your main network remains secure and performs optimally.
How to Do It:
- Access your router’s settings and look for the Guest Network option.
- Create a new network name (SSID) that is distinct from your main network.
- Set a password for the guest network to prevent unauthorized access.
- Limit the bandwidth available on the guest network if your router supports this feature, ensuring it doesn’t slow down your primary network.
Pro Tip:
For businesses, guest networks are a great way to offer Wi-Fi to customers while protecting sensitive data on your internal network.
3. Monitor Connected Devices to Manage Bandwidth Effectively
Why It’s Important:
Knowing which devices are connected to your network helps you identify and resolve bandwidth issues. Too many devices streaming, gaming, or downloading simultaneously can slow down your network.
How to Do It:
- Log into your router’s admin panel and navigate to the Device List or Connected Devices section.
- Identify devices consuming the most bandwidth. Many modern routers provide usage statistics for each device.
- Disconnect unknown devices to protect your network and conserve bandwidth.
- Use Quality of Service (QoS) settings to prioritize critical devices, such as your work laptop or gaming console, ensuring they get the bandwidth they need.
4. Optimize Wi-Fi Channels
Why It’s Important:
Wi-Fi routers operate on specific channels, and overcrowded channels (common in apartment buildings or dense neighborhoods) can lead to interference and slower speeds.
How to Do It:
- Use a Wi-Fi analyzer app to identify the least crowded channel in your area.
- Log into your router’s settings and manually switch to a less congested channel.
- For dual-band routers, use the 5GHz band for devices close to the router, as it provides faster speeds and less interference compared to 2.4GHz.
5. Reboot Your Router Regularly
Why It’s Important:
Routers can experience memory leaks or software glitches over time, leading to slower speeds or connectivity issues. A simple reboot can clear these issues and refresh your network.
How to Do It:
- Power off the router, wait 10-30 seconds, and then turn it back on.
- For convenience, consider setting up a smart plug with a timer to automate periodic reboots.
6. Secure Your Network with Strong Passwords and Encryption
Why It’s Important:
An unsecured network is vulnerable to unauthorized access and cyberattacks. Ensuring your network is protected with strong security settings prevents data breaches and keeps your bandwidth reserved for your devices.
How to Do It:
- Use WPA3 encryption (or WPA2 if WPA3 isn’t available) for your Wi-Fi network.
- Choose a strong password with a mix of letters, numbers, and symbols. Avoid using easily guessed words like “password” or your name.
- Change your password periodically to enhance security.
7. Position Your Router Strategically
Why It’s Important:
Poor router placement can lead to dead zones and weak signals, even with a strong Wi-Fi setup.
How to Do It:
- Place the router in a central location, elevated off the floor, and away from walls or large metal objects.
- Avoid placing the router near other electronic devices that might interfere with the signal.
- Use Wi-Fi extenders or mesh systems if certain areas of your home or office still experience weak signals.
8. Perform Periodic Speed Tests
Why It’s Important:
Regularly testing your Wi-Fi speeds helps you determine if your network is performing as expected. It also helps identify issues caused by your ISP or router setup.
How to Do It:
- Use a trusted speed test tool (such as Ookla Speedtest or Fast.com) to measure your upload and download speeds.
- Compare the results with the speed tier you’re paying for from your ISP.
- If speeds are significantly lower, troubleshoot by rebooting your router, checking for firmware updates, or contacting your ISP.
Wi-Fi Installation Done Right: Keep Your Network Running Strong
Maintaining a strong Wi-Fi network isn’t just about the initial setup—it’s about proactive management and care. By updating your router’s firmware, creating guest networks, monitoring connected devices, and securing your network, you can enjoy fast, reliable internet for years to come.
If you need help setting up or optimizing your network, TekDash offers professional home and business Wi-Fi setup services tailored to your needs.
A reliable Wi-Fi network is vital for staying connected in today’s world. By following the steps outlined in this guide, you can set up a fast and secure wireless network that meets your needs. For those who prefer a hands-free experience, TekDash provides professional services to ensure your Wi-Fi performs flawlessly.