Wifi
PoE vs Solar Power for Outdoor WiFi
Explore the pros and cons of Power over Ethernet vs. solar power for outdoor WiFi, and find the best solution for your specific needs.
Smart router placement, channel tuning, and moving devices to 5/6 GHz eliminate workplace WiFi interference and restore reliable connectivity.
WiFi interference can disrupt your internet connection, leading to slower speeds, dropped calls, and poor performance. To improve your network's reliability at work, focus on these key strategies:
These steps ensure a stronger, more reliable connection, boosting productivity and reducing frustration.
Placing your router in the right spot can make a world of difference for your WiFi coverage. A central location in a 100-foot workspace ensures the signal reaches all corners evenly. This setup avoids wasting coverage on areas like the outdoors and reduces the distance the signal needs to travel compared to positioning it in a corner. Proper placement also lays the groundwork for reducing interference, which can be further improved through channel adjustments and device management.
Height matters. Mounting your access points 6 to 8 feet above the ground helps avoid obstacles like furniture, cubicle walls, and even people. Why people? Because human bodies absorb WiFi signals - similar to walls - leading to about a 3 dBm loss per person. If ceiling mounting isn’t an option, a tall bookshelf can do the trick. For two-story offices, placing the router near the ceiling on the first floor helps the signal reach upstairs.
It’s also important to maintain a clear line of sight between your router and the devices that need the strongest connection. Following the "two-wall rule" - keeping no more than two rooms or interior walls between the router and connected devices - can significantly improve network performance. Once the router is in the best spot, you can further reduce interference by tweaking wireless channels and managing connected devices.
Some placement choices can severely impact your WiFi performance. For instance, putting your router on the floor is a bad idea since floors, carpets, and nearby metal objects can absorb or reflect your signal. Similarly, hiding routers in closets or behind furniture not only weakens the signal but also makes maintenance more difficult.
Another common mistake is placing routers in breakrooms or kitchens, where microwaves operating at 2.4 GHz can disrupt the signal. Avoid areas with heavy obstructions like metal cabinets, mirrors, or concrete walls. If a dense object, such as a concrete slab, blocks the signal, consider adding multiple access points to work around the obstacle instead of forcing the signal through it.
Here’s a quick guide to how different materials affect WiFi signals:
| Material | Interference Level | Common Examples |
|---|---|---|
| Wood, Drywall, Plaster | Low | Interior walls, hollow doors, partitions |
| People, Tinted Glass | Medium | High-traffic areas, exterior windows |
| Concrete, Brick | Medium/High | Outer walls, structural pillars |
| Mirrors, Metal, Water | High | Reflective glass, filing cabinets, aquariums |
Optimizing your router's placement is a great first step, but it won’t solve everything. One major issue is channel congestion. Even with the best placement, overlapping signals from nearby networks can slow down your connection. This is especially true for the 2.4 GHz band, which only has three non-overlapping channels: 1, 6, and 11. With so many devices competing for the same space, switching to a less crowded channel can make a noticeable difference. But before you dive into your router settings, you’ll need to figure out which channels are the least congested. That’s where WiFi scanners come in handy.
WiFi scanners help you identify which channels nearby networks are using. Tools like NetSpot - a favorite among users with a 4.8/5 rating from 969 reviews - are available for Windows, macOS, and Android. These tools show every network within range, along with its channel, signal strength, and band. If you're using a Mac, you can access a built-in scanner by holding the Option key, clicking the WiFi icon, and selecting "Open Wireless Diagnostics." From the "Window" menu, choose "Scan" to see a list of nearby networks and recommended channels.
Once you’ve gathered the data, sort the networks by channel to spot congestion. Pay attention to the signal strength (RSSI). A strong signal from a neighboring network on an adjacent channel can cause more interference than a weak signal on your own channel. For instance, if channel 6 has five networks with signals around –75 dBm, but channel 1 only has one network at –80 dBm, channel 1 is likely the better choice. Generally, a signal level of –75 dBm or better is sufficient for stable browsing and streaming.
Watch out for partial overlap. When networks operate on adjacent channels (like 2 and 3), they create interference that disrupts data transmission, leading to slower speeds and constant retransmissions. As NetSpot highlights:
Full overlap is better than partial if no clean channels remain.
This is because networks on the same channel can share airtime using built-in protocols, while adjacent channels lack this coordination. If you’re stuck in a crowded 2.4 GHz environment, sticking to a 20 MHz channel width can also help minimize interference.
Once you’ve identified a clear channel, you’ll need to update your router settings. Start by accessing your router’s admin interface, usually found at an IP address like 192.168.1.1, 192.168.0.1, or 10.0.0.1. The default login credentials are often printed on a sticker on the router itself. Navigate to the "Wireless", "Advanced", or "Wireless Settings" section. Look for the "Channel" or "Control Channel" option, which is typically set to "Auto."
Now, select your preferred channel based on the scanner results. For the 2.4 GHz band, stick to channels 1, 6, or 11 to avoid overlapping interference. For the 5 GHz band, non-DFS channels like 36, 40, 44, or 48 are generally better for compatibility. Save your changes, and keep in mind that your network will briefly disconnect as the router restarts. After a few minutes, run another scan to confirm the switch worked and check if your performance has improved.
| Router Brand | Access URL / IP | Navigation Path |
|---|---|---|
| TP-Link | 192.168.0.1 / 192.168.1.1 | Advanced → Wireless → Wireless Settings |
| ASUS | router.asus.com / 192.168.1.1 | Wireless → General → Control Channel |
| Netgear | routerlogin.net | Wireless Settings → Channel |
| Linksys | Router IP | Wireless functions → Channel |
| Xfinity | 10.0.0.1 | Gateway → Connection → Wi-Fi → Edit |
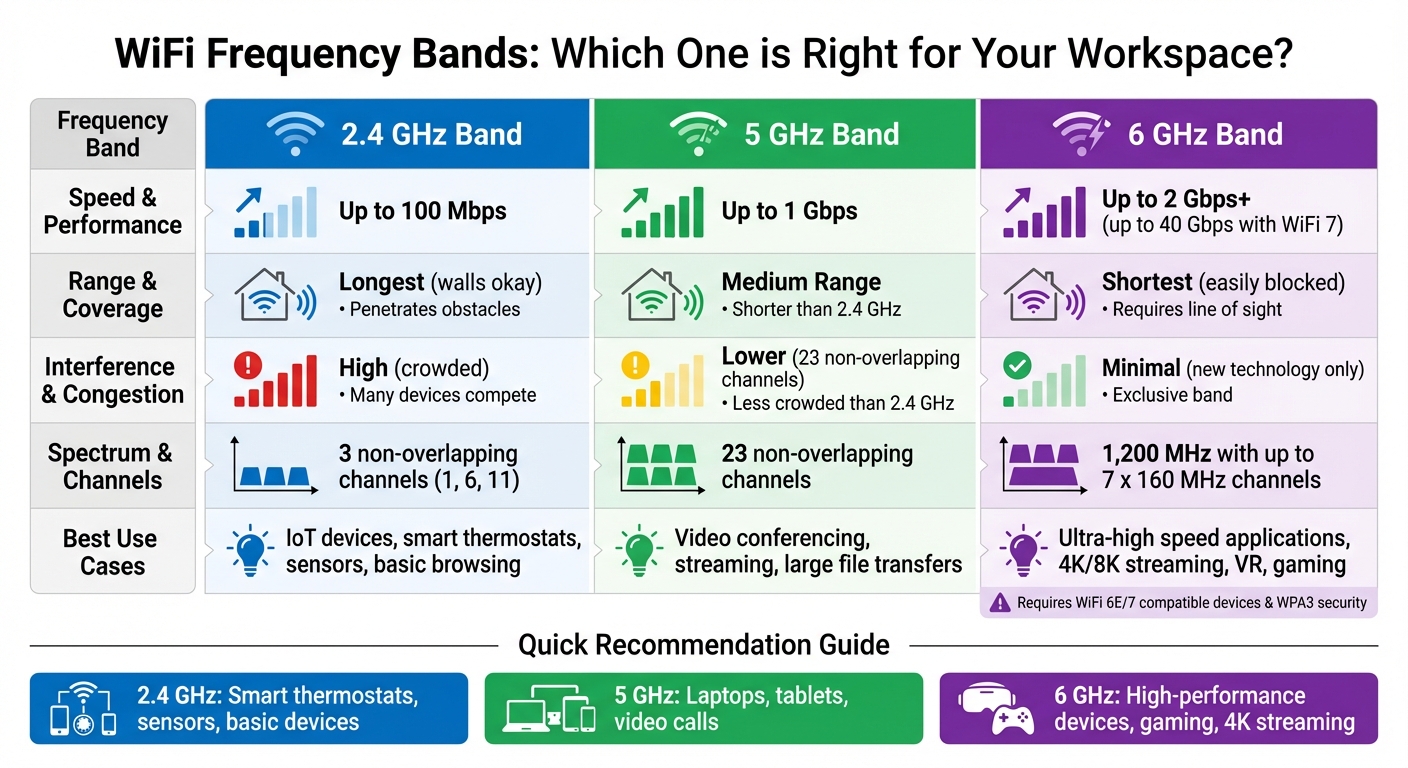
WiFi Frequency Bands Comparison: 2.4 GHz vs 5 GHz vs 6 GHz
If you're dealing with sluggish performance caused by interference on the 2.4 GHz band, moving to higher-frequency bands like 5 GHz or 6 GHz can make a big difference. The 2.4 GHz band, which spans only 70 MHz, is shared with many other devices - think microwaves, Bluetooth gadgets, and baby monitors. This crowded space means that even careful channel management won't completely avoid interference. By switching to 5 GHz or 6 GHz, you gain access to wider, less congested airwaves, paving the way for faster speeds and lower latency.
The 5 GHz band offers 23 non-overlapping channels and supports speeds up to 1 Gbps, making it perfect for tasks like video conferencing and large file transfers. Meanwhile, the 6 GHz band takes things further, providing a whopping 1,200 MHz of spectrum and up to seven 160 MHz channels. This enables speeds of 2 Gbps or more, and with WiFi 7, speeds can soar to 40 Gbps. The 6 GHz band is exclusively used by WiFi 6E and WiFi 7 devices, reducing interference from older tech - ideal for high-demand activities like 4K streaming and virtual reality.
These higher bands also deliver lower latency, which is a game-changer for real-time applications like voice and video calls. However, they come with shorter ranges, so in larger spaces, a mesh network might be necessary.
Here’s a quick comparison of the three frequency bands:
| Feature | 2.4 GHz | 5 GHz | 6 GHz |
|---|---|---|---|
| Speed | Up to 100 Mbps | Up to 1 Gbps | Up to 2 Gbps+ |
| Range | Longest (walls okay) | Medium | Shortest (easily blocked) |
| Interference | High (crowded) | Lower (23 channels) | Minimal (new tech only) |
| Best Use | IoT, basic browsing | Streaming, calls | Ultra-high speed, 4K/8K, VR |
Before switching, make sure both your devices and router support these higher-frequency bands. For example, WiFi 5 (802.11ac) works mainly on 5 GHz, while WiFi 6 (802.11ax) supports both 2.4 GHz and 5 GHz but not 6 GHz. Access to the 6 GHz band requires WiFi 6E or WiFi 7 devices. Laptops like Intel Evo and vPro models from 2022 onward are equipped with WiFi 6E.
To check compatibility:
netsh wlan show drivers, and look for "Radio types supported" to confirm 802.11ax (WiFi 6) or 802.11be (WiFi 7).Your router also needs to support these bands. Look for terms like "Dual-band" (2.4 GHz and 5 GHz), "Tri-band" (adds 6 GHz), or even "Quad-band" on the packaging. Note that the 6 GHz band requires WPA3 security, as older WPA2 protocols aren't compatible.
Intel highlights the following requirements for 6 GHz functionality:
6 GHz Wi-Fi 6E functionality requires Intel® Wi-Fi 6E products, Wi-Fi 6E access points/routers/gateways, operating-system support for 6 GHz operation, along with country-specific 6 GHz spectrum allocation.
For the best results, reserve the 2.4 GHz band for low-bandwidth IoT devices like smart thermostats, freeing up the faster bands for more demanding applications.
Once you've optimized your router's settings and placement, the next step to improving your network's performance is cutting down interference from devices and physical barriers. The 2.4 GHz spectrum, for example, has only 3 non-overlapping channels, making it especially prone to interference from other devices using the same frequency. Identifying these sources and making adjustments can significantly boost your signal strength - no pricey upgrades needed.
Certain household and office devices can wreak havoc on your WiFi. Microwaves, for instance, can slash speeds on the 2.4 GHz band by as much as 50%. Other culprits include cordless phones, Bluetooth devices, baby monitors, and wireless security cameras - all of which compete for the same airspace.
But it's not just wireless gadgets causing trouble. Infrastructure within your office can also generate electromagnetic noise, harming your network's performance. Electrical panels, unshielded cables, and conduits are common offenders. Additionally, high-bandwidth equipment like video conferencing tools or streaming displays can congest the network, creating interference for everyone else. The solution? Keep your router several feet away from devices like microwaves, cordless phones, and large monitors. For stationary, high-demand equipment, connect them via Ethernet cables to reduce the strain on your WiFi. Also, ensure power and video cables are properly shielded to limit electromagnetic interference. Rearranging your workspace can further clear the airwaves.
Physical barriers in your workspace can also weaken WiFi signals. Items like metal filing cabinets, mirrors, or large aquariums are notorious for reflecting or absorbing signals. Concrete walls, brick, and tinted glass fall into the medium-to-high interference category, while standard drywall and wood cause minimal disruption. As Jim Salter from Ars Technica explains:
A single human body provides roughly as much signal attenuation as an interior wall - which is part of the reason you might notice Wi-Fi at your house getting frustratingly slower or flakier than usual when many friends are over for a party.
If an immovable barrier like a concrete wall is in the way, consider using multiple access points to route the signal through doorways or hallways instead of forcing it to penetrate the obstruction. Also, try repositioning metal partitions, filing cabinets, and reflective glass to clear the direct line between your router and workstations. Keep in mind that the 5 GHz and 6 GHz bands rely more heavily on a clear line of sight compared to the 2.4 GHz band.
Once you've optimized your router settings, the next step is extending your network's range. If adjustments to router placement and interference control still leave gaps, it's time to consider expanding your network. Both mesh networks and WiFi extenders address this issue, but the right choice depends on factors like your workspace size, budget, and connectivity needs.
A mesh network operates using multiple identical nodes that work together as a single system. One node connects directly to your modem, while additional nodes are placed throughout your space to distribute network traffic effectively. Unlike traditional setups where a single router handles everything, mesh systems share the load across all nodes.
One of the key benefits of mesh networks is seamless roaming. With a single network name (SSID), your devices automatically connect to the strongest node as you move around, eliminating the need for manual switching. Many high-end systems even use a dedicated radio band - often 5 GHz or 6 GHz - for communication between nodes, ensuring speed and reliability even as data flows across multiple points. Coverage typically ranges from 2,000 to 5,500 square feet, with examples like the TP-Link Deco S4 ($129.99, 5,600 sq. ft. coverage) and Google Nest Wifi Pro ($399.99, 6,600 sq. ft.).
For optimal performance, satellite nodes should be placed within 30 feet of each other. If your workspace is pre-wired with Ethernet, you can connect the nodes via LAN cables for a wired backhaul, which provides the fastest and most stable connection possible.
WiFi extenders are a simpler and more affordable option, typically costing between $50 and $100. They work by capturing your router's signal and rebroadcasting it to cover areas with weak or no signal. However, extenders operate in half-duplex mode, meaning they can't send and receive data at the same time, which cuts your available bandwidth in half. Additionally, they create a separate network, requiring you to manually switch between networks as you move around.
Joel Crane, a Certified Wireless Network Expert at Juniper Networks, explains:
Mesh systems and extenders are primarily designed to solve one problem: Bad signal strength.
When interference is managed, choosing between these options depends on your specific needs. If you're addressing a single dead zone and working with a tight budget, a WiFi extender may be the way to go, even if it means switching networks manually. On the other hand, a mesh system is better suited for larger spaces - especially those over 2,000 square feet, with multiple floors, or where uninterrupted connectivity is crucial for activities like video calls or VoIP.
Before making a purchase, use a tool like InSSIDer Lite to measure your signal strength. If readings fall between –30 and –67 dBm, the problem might be congestion or your ISP's speed rather than coverage issues.
Take control of your network's bandwidth to ensure critical tasks always get the attention they deserve. By combining network segmentation and Quality of Service (QoS) with smart router placement and interference management, you can fine-tune how bandwidth is allocated. Without these measures, a single device streaming 4K video or downloading large files could disrupt essential applications. But with segmentation and QoS, you decide which devices and apps take priority.
Network segmentation divides your infrastructure into smaller, virtual networks called VLANs (Virtual Local Area Networks). Instead of cramming all devices and activities onto one busy network, you can separate traffic into distinct lanes. For instance, you might dedicate one VLAN to business operations, another to personal streaming, and a third to guest access. This approach not only prevents bandwidth-heavy activities from slowing down critical work but also improves security by isolating guest users from sensitive business data.
Additionally, you can assign specific bandwidth limits to each segment. This ensures guest users won't hog resources meant for employees. For devices that don’t rely on WiFi, like desktop computers or printers, connecting them via Ethernet can free up wireless capacity for mobile devices that need it. By segmenting your network, you create a solid foundation for optimizing performance further with QoS.
Once your network is segmented, QoS takes things a step further by prioritizing specific types of traffic. This helps manage issues like latency, jitter, and packet loss. Most wireless devices already use Wi-Fi Multimedia (WMM) mode, which categorizes traffic into four priority levels:
You can apply QoS rules to specific network ports, SSIDs, or even individual devices. For example, if your CEO’s laptop needs uninterrupted performance for video calls, you can prioritize it by its MAC address, no matter which network it’s on. To set effective QoS limits, measure your connection speed using a tool like Speedtest.net. Then, configure QoS to use 80-95% of your tested speed, leaving enough room for your router to manage traffic efficiently.
However, keep in mind that enabling QoS on some gateways may reduce maximum throughput by 24-45% for traffic over 1 Gbps, as it can disable hardware acceleration. For most small and medium-sized workspaces, this trade-off is manageable. As Jason Fitzpatrick from How-To Geek puts it:
Quality of Service is an excellent and underutilized tool that allows you to train your router to divvy up your available bandwidth between applications.
Once you've set up network segmentation and QoS, the next step is keeping an eye on your network's activity. Without knowing which devices are connected and how much bandwidth they're using, you risk unexpected slowdowns. By monitoring your network, you can catch unauthorized users, identify devices consuming excessive bandwidth, and address potential issues before they impact your day.
Keeping tabs on connected devices helps reduce network congestion. Most routers have a "Device List", "Attached Devices", or "DHCP Clients" section in their web admin panel or mobile app. To access this, find your router's IP address using system tools, then enter it in your web browser. This section typically shows details like hostnames, IP addresses, MAC addresses, and manufacturer names. If you spot an unfamiliar device, compare its MAC address with the devices you own to confirm whether it's authorized.
For more advanced tracking, tools like GlassWire Pro (priced at $39 for one PC) and NirSoft's Wireless Network Watcher (free) can help. These tools not only detect active devices but also provide bandwidth usage graphs and send alerts when new devices join your network. If you find unauthorized devices, update your Wi-Fi to a WPA3 or WPA2 passphrase to force re-authentication for all users.
Your router's web interface is a great starting point for monitoring bandwidth, as it tracks all incoming and outgoing traffic. For a deeper dive, software like Paessler PRTG (free for up to 100 sensors) can analyze traffic using SNMP-based monitoring, helping you pinpoint bandwidth-heavy devices or applications. For businesses, solutions like Cisco Business Wireless AP Monitoring provide dashboards that show which apps - like YouTube or Gmail - are consuming the most data.
Luca Meneghesso, a Senior IT Infrastructure and Security Specialist at Banca Profilo, shared his experience with PRTG:
Adopting PRTG has been like going from being in the dark to being in the light. Before, we had limited visibility... now we receive constant updates on the status of facilities and services.
Once you identify bandwidth-draining devices or applications, you can take action. Limit their traffic if they're non-essential or switch high-usage devices to wired Ethernet connections to ease the load on your wireless network. This ensures smoother performance for everyone.
Improving WiFi performance in your workspace starts with smart router placement. Position your router centrally, at an elevated spot, and away from obstacles like metal partitions, concrete walls, and mirrors that can weaken signals. Use WiFi scanning tools to detect crowded channels and manually switch to less congested ones - like channels 1, 6, or 11 for 2.4 GHz networks. For devices that demand higher bandwidth, move them to 5 GHz or 6 GHz bands to avoid the overcrowded 2.4 GHz spectrum, where even a small noise increase (around 3 dB) can reduce WiFi 6E speeds by up to 30%. Keep devices like microwaves, Bluetooth speakers, and cordless phones away from your router to minimize interference, and consider mesh networks with wired backhaul to cover larger spaces without dead zones.
Stay on top of your network by monitoring connected devices and bandwidth usage to quickly identify unauthorized users or devices consuming excessive bandwidth. In more complex setups, professional site surveys and spectrum analyzers can help you understand signal performance and avoid pitfalls like adding too many access points, which can cause co-channel interference. By following these steps, you can create a workspace with dependable WiFi that keeps your team productive and connected.

TekDash is here to make these strategies easier to implement. TekDash specializes in professional WiFi and Ethernet installation, handled by certified technicians. From optimizing router placement and selecting the best channels to setting up mesh networks and extending WiFi coverage, TekDash customizes solutions to meet your business's specific needs. Whether you require on-site assistance for a complete network overhaul or remote troubleshooting to tackle interference issues, TekDash provides reliable, expert service to keep your network running smoothly.
Ready to upgrade your workspace connectivity? Visit TekDash to schedule a consultation and get started.
WiFi issues can often stem from two main culprits: interference and weak coverage.
Interference leads to problems like unstable or slow connections, frequent disconnections, or signals that seem inconsistent - even when you're close to the router. On the other hand, weak coverage shows up as low signal strength or dead zones, especially as you move farther away from the router.
To troubleshoot, try using WiFi analysis tools. These tools can help you detect competing signals causing interference or identify where your signal weakens significantly over distance. Spotting these patterns makes it easier to figure out what's wrong and decide on the best solution.
The 6 GHz band delivers faster speeds and reduced congestion, making it a top choice if your devices are compatible with WiFi 6E or newer standards like WiFi 7. However, if your devices don’t support these, the 5 GHz band remains a dependable option, offering solid high-speed connectivity. Opt for 6 GHz when you need peak performance in crowded environments, and stick with 5 GHz for broader compatibility and steady, reliable connections for everyday tasks.
For large or multi-story homes where a single router or extender struggles to eliminate dead zones, a mesh WiFi system is the way to go. These systems use multiple nodes to create a unified, strong signal throughout your space, making them perfect for tricky layouts. While extenders can work in smaller areas, they often come with drawbacks like added latency and reduced bandwidth. For consistent, reliable performance in bigger setups, mesh networks are the smarter choice.
Explore the pros and cons of Power over Ethernet vs. solar power for outdoor WiFi, and find the best solution for your specific needs.
Identify and fix WiFi channel overlap: symptoms, causes, and practical steps like using analyzers, choosing non-overlapping channels, adjusting...
Pinpoint causes of WiFi interference and restore stable connectivity with band switching, router placement, channel tuning, mesh systems, or pros.