Wifi
Persistent WiFi Interference: Causes and Solutions
Pinpoint causes of WiFi interference and restore stable connectivity with band switching, router placement, channel tuning, mesh systems, or pros.
Small placement and settings changes eliminate most WiFi interference and restore fast, reliable home connectivity.
WiFi interference can slow down your internet, cause dropped connections, and disrupt your devices. The good news? You can fix most issues by addressing common culprits like poor router placement, physical barriers, and overlapping signals. Here's a quick guide to boosting your WiFi performance:
If these steps don’t solve your issues, professional help may be needed to diagnose and resolve complex problems. Services like TekDash offer both remote and on-site support to ensure reliable, fast connectivity.
WiFi Signal Loss by Building Material - Complete Comparison Guide
Where you place your router plays a big role in how well your WiFi performs. Both the location and height of the router can impact how far and effectively the signal travels throughout your space.
For the best results, put your router in a central spot so the signal can spread evenly in all directions. If you stick it in a corner or near an exterior wall, you'll waste coverage on areas you don't need, like outside your home.
Height matters, too. Place the router at chest height or higher to avoid signal loss caused by the floor. As Kate Fann explains, “A cabinet, especially one made of wood or metal, acts as a physical barrier that can block and weaken the wireless signal”. So, avoid hiding your router in cabinets or closets.
If your router has adjustable antennas, set one vertically and the other horizontally. This helps maximize signal strength for both horizontal and vertical coverage.
Household electronics can wreak havoc on your WiFi signal. Keep your router at least three to five feet away from devices like microwaves, which are notorious for interfering with WiFi. Microwaves operate on the same 2.4 GHz frequency as many routers and emit bursts of electromagnetic interference when in use. This interference can degrade your signal within a 10-foot radius.
Other devices to watch out for include older cordless phones, baby monitors, and Bluetooth gadgets. These also compete for bandwidth on the crowded 2.4 GHz spectrum. Large metal appliances - like refrigerators or filing cabinets - can reflect radio waves and block signals entirely. Even water sources, such as aquariums or water heaters, can disrupt your WiFi because water absorbs the signal effectively.
Interior walls also weaken signals. On average, WiFi signal strength drops by about 6 dB for every wall it passes through. If you combine this with interference from appliances, your connection can take a significant hit. To mitigate this, use the 5 GHz band on a dual-band router for high-bandwidth devices. The 5 GHz band avoids much of the interference common on the 2.4 GHz spectrum.
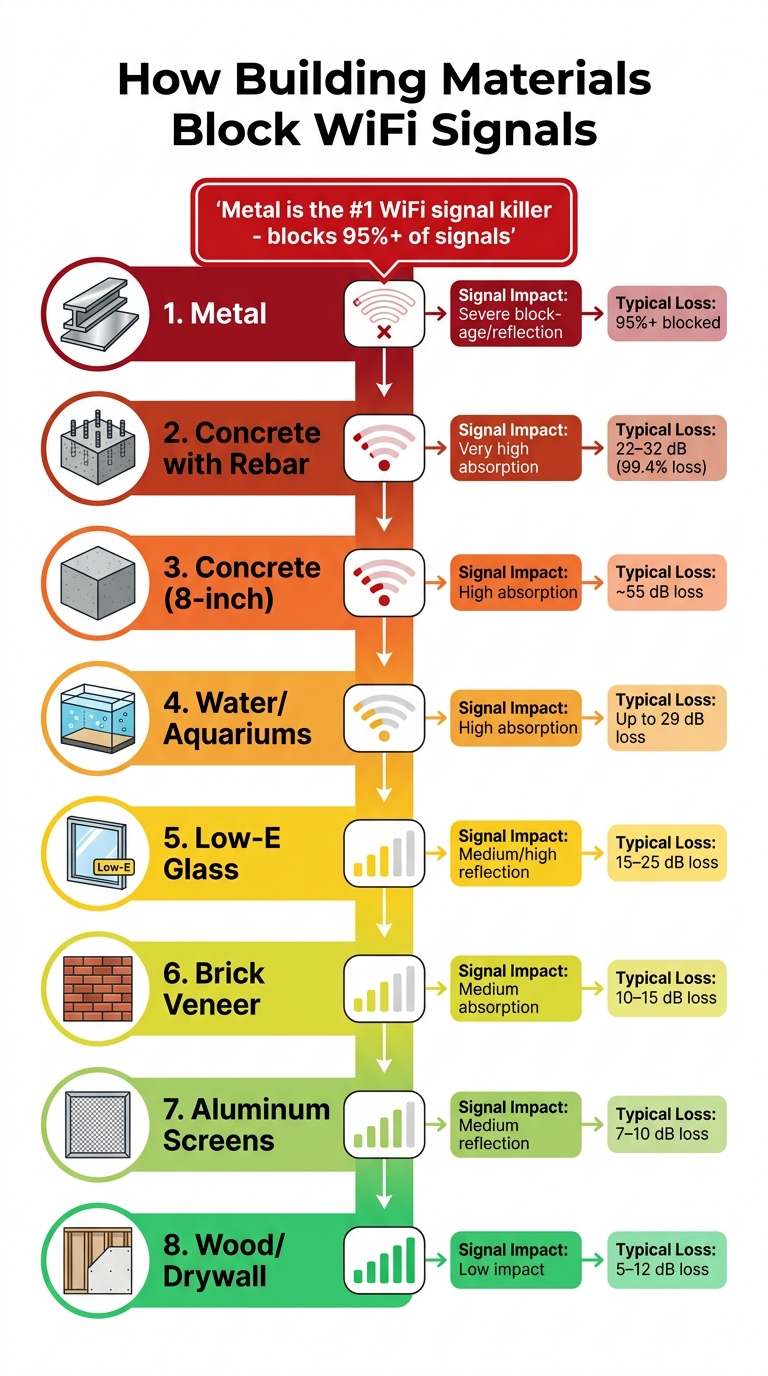
WiFi signals can be surprisingly sensitive to the materials around them. Knowing which materials disrupt signals the most can help you position your router and devices for better connectivity.
Metal tops the list of signal blockers. As Sam Watanuki puts it, "Metal is the ultimate WiFi signal killer. As a conductor of electricity, metal absorbs and reflects electromagnetic waves, making it extremely difficult for WiFi signals to penetrate". Everyday items like filing cabinets, metal-framed mirrors, and even aluminum window screens can interfere with your connection. Placing a router inside a metal TV cabinet, for instance, creates a "Faraday cage" that blocks over 95% of WiFi signals.
Concrete and brick are also major culprits. An 8-inch concrete wall can reduce signal strength by up to 55 decibels. If the concrete has steel rebar - a common feature in modern buildings - this effect worsens, with 5 GHz signals losing 22–32 dB, which equals a staggering 99.4% reduction in signal power. Brick veneer isn’t much better, causing a 10–15 dB loss.
Water-based obstacles can be surprisingly disruptive. Features like indoor waterfalls, large potted plants with moist soil, and even the human body absorb WiFi signals because water conducts electricity.
Low-E glass, often used in energy-efficient windows, can also interfere with WiFi. These windows have thin metallic coatings that reflect signals, causing a 15–25 dB loss at 5 GHz. Aluminum window screens add another 7–10 dB of loss. On the other hand, materials like wood and drywall are much less problematic, typically causing only 5–12 dB of signal loss.
| Material | Signal Impact | Typical Loss |
|---|---|---|
| Metal | Severe blockage/reflection | 95%+ blocked |
| Concrete (8-inch) | High absorption | ~55 dB loss |
| Concrete with Rebar | Very high absorption | 22–32 dB (99.4% loss) |
| Low-E Glass | Medium/high reflection | 15–25 dB loss |
| Brick Veneer | Medium absorption | 10–15 dB loss |
| Water/Aquariums | High absorption | Up to 29 dB loss |
| Aluminum Screens | Medium reflection | 7–10 dB loss |
| Wood/Drywall | Low impact | 5–12 dB loss |
Recognizing how these materials affect WiFi gives you the knowledge to make informed changes and reduce interference.
You don’t need to overhaul your space to improve WiFi performance - small tweaks can make a big difference. Here’s how to counteract common signal blockers.
Maintain distance from metal objects. Keep at least 3 feet of clearance between your router and large metal items like refrigerators, filing cabinets, or metal-framed mirrors. Also, avoid placing the router where its signal has to pass through aquariums or water features to reach your devices.
Choose an open, elevated location. Moving your router from a closed-off spot to an open, central area can significantly improve signal strength. For instance, relocating a router to an open shelf can increase median 5 GHz signal strength by 18 dBm and cut video call packet loss by 63%. Ideally, place it at waist height (3–4 feet) or higher for the best results. As Mia, a Digital Productivity Coach, explains:
"This isn't about 'boosting' signal - it's about removing tangible obstructions".
Swap out reflective materials. Replace metal blinds with fabric curtains or opt for wood-framed mirrors instead of metal ones. These changes minimize signal reflection and improve overall coverage. For thicker barriers like concrete walls, consider running an Ethernet cable through the wall to connect a WiFi extender on the other side.
Use a WiFi analyzer app. These apps can help you locate weak signal areas in your home. A signal strength below –67 dBm is too weak for reliable streaming or video calls. Once you identify dead zones, rearrange furniture or move devices to reduce the number of obstructions between them and the router.
These adjustments, combined with optimal router placement and settings, can significantly improve your WiFi network's performance. By addressing physical barriers, you can make the most of your internet connection.
Once you've improved your router's placement and minimized physical barriers, it's time to tweak your network settings to cut down on interference even further.
Think of WiFi channels like traffic lanes - when too many users crowd the same lane, things slow down. Your router competes for airspace with nearby networks, so selecting the right channel can make a big difference.
The 2.4 GHz band is often the busiest since it only has three non-overlapping channels: 1, 6, and 11. Using other channels causes overlap, which increases interference. The 5 GHz band, on the other hand, offers more channels and less congestion. And if you have a router and devices that support WiFi 6E or WiFi 7, the 6 GHz band provides the cleanest spectrum with minimal interference.
| Frequency Band | Max Speed | Range | Interference Level | Best Use Cases |
|---|---|---|---|---|
| 2.4 GHz | Up to 100 Mbps | Longest | High | IoT devices, basic browsing |
| 5 GHz | Up to 1 Gbps | Mid-range | Moderate | Streaming, gaming, video calls |
| 6 GHz | Up to 2 Gbps | Shortest | Low | Ultra-fast speeds, low-latency apps |
To identify the least crowded channels, use a WiFi analyzer app like NetSpot, Acrylic, or WiFi Analyzer for Android. These tools help you scan nearby networks and pinpoint the clearest options. As the eero Help Center explains:
"Channel busyness is a major factor in the performance of your wifi network. In short, the lower channel busyness is in your environment, the better your devices are likely to perform."
Access your router's settings (usually at 192.168.1.1 or 192.168.0.1 in a browser) and manually select a clear channel. Avoid relying on "auto" mode, as it often picks channels that are already crowded.
For bandwidth settings, use 20–40 MHz on 2.4 GHz, 80 MHz on 5 GHz, and 160 MHz on 6 GHz if interference is minimal. If your region supports DFS (Dynamic Frequency Selection) channels in the 5 GHz band, these are worth exploring since fewer devices use them.
Once you've selected the best channel, fine-tune your router's settings to maximize performance.
First, update your router's firmware through the admin interface. Manufacturers frequently release updates to fix bugs and improve performance.
Enable Quality of Service (QoS) and set it to 85–95% of your maximum internet speed. This feature prioritizes traffic for critical devices, like work computers or gaming consoles, and helps prevent lag during heavy network usage. If Band Steering doesn't work well, create separate SSIDs for each band (e.g., "Home_5G" and "Home_2.4G").
Another important step is to disable legacy 802.11b rates (1, 2, 5.5, and 11 Mbps). These outdated speeds can slow down your entire network when older devices connect. Also, ensure you're using WPA2 or WPA3 security protocols. Older options like WEP or TKIP not only reduce speed but also leave your network vulnerable.
For better coverage, position your router's antennas strategically - place one vertically and the other horizontally if you're covering multiple floors. On your devices, set wireless adapters to "Maximum Performance" to minimize latency. And don't underestimate the power of a simple restart. As Dave Coleman, Director of Wireless Networking at Extreme Networks, points out:
"It's amazing how [resetting equipment] will solve like 90% of the problems, because the drivers are the interface between the radio and the operating system, and they can get discombobulated."
Even with carefully adjusted settings, household electronics can disrupt your WiFi signal. The 2.4 GHz band is particularly prone to interference since many everyday devices operate on this frequency.
In addition to optimizing your router's placement and settings, managing interference from nearby electronics is crucial for maintaining a steady network.
Microwave ovens are some of the biggest culprits. On the 2.4 GHz band, a microwave can cause up to 50% packet loss and reduce speeds by nearly 80%.
Take this example: In early 2026, Alex, a software developer in Austin, faced issues with Zoom calls lagging right around lunchtime. Despite upgrading his router and cables, the problem persisted. It turned out his roommate’s microwave - located about 16 feet away - was disrupting the 2.4 GHz signal. Once Alex switched his laptop to the 5 GHz band, the problem disappeared entirely.
Other electronics can also contribute to interference. By 2026, the average household manages around 21 active internet-connected devices at any given time, all competing for bandwidth. To ease the strain, move high-demand devices like laptops, gaming consoles, and streaming boxes to the 5 GHz or 6 GHz bands. Reserve the 2.4 GHz band for smart home gadgets that don’t need as much speed and are farther from the router.
If moving devices isn’t an option, make sure your most critical ones aren’t sharing the same frequency as nearby electronics. And if interference still causes trouble, restarting your network might help reset the connection.
Sometimes, the simplest solution is the best one. Restarting your router can help clear out stale connections and resolve temporary interference. Here’s how:
This step-by-step approach ensures both devices reboot fully and re-establish a clean connection.
If your internet remains slow, try disconnecting devices one at a time to pinpoint the issue. Alternatively, a WiFi analyzer can help identify background processes or devices hogging bandwidth.
If you've already optimized your router's placement and settings but still struggle with weak signals in certain areas, it may be time to extend your WiFi coverage. A single router often can't cover every corner of a home, especially in larger or multi-story spaces.
Before investing in additional hardware, try placing your router in a central location to address smaller dead zones. If that doesn't solve the issue, extending your network can help ensure consistent connectivity throughout your home.
Mesh networks use multiple nodes to create a unified WiFi system, making them ideal for maintaining strong signals across multiple levels or large areas. Because WiFi signals weaken as they pass through walls and floors, mesh systems are a reliable way to ensure consistent performance.
Opt for tri-band mesh systems, which dedicate one channel exclusively for communication between nodes. This setup avoids the bandwidth reduction seen with single-radio extenders, which can cut bandwidth by 50% and introduce latencies of 40 milliseconds or more. In contrast, mesh systems typically maintain latency between 12 and 15 milliseconds.
| Home Size | Suggested Mesh Setup |
|---|---|
| Under 1,000 sq ft | 1 mesh router |
| 1,000–2,500 sq ft | 1 router + 1 node |
| 2,500–3,500 sq ft | 1 router + 2 nodes |
| 3,500–4,500 sq ft | 1 router + 3 nodes |
| Over 4,500 sq ft | 1 router + 4 or more nodes |
Mesh systems can cost anywhere from $200 for basic models to over $1,000 for high-end options. They also come with self-healing features, automatically rerouting traffic if a node goes offline. Choose a system that aligns with your home's size and your budget.
For smaller spaces or single dead zones, WiFi extenders provide a cost-effective alternative to mesh systems. These devices are typically priced between $30 and $100, making them accessible for targeted use. However, most extenders rely on a single radio for both receiving and transmitting signals, which can reduce bandwidth by 50%.
To maximize performance, place the extender about halfway between your router and the dead zone, ideally within 30 feet of the router. Keep in mind that many extenders create a separate network name (often adding "_EXT" to the original name), which means you may need to manually switch networks as you move around your home.
For a single problematic area, extenders can be a practical and affordable solution. However, if you're dealing with multiple dead zones or need seamless coverage across a larger space, a mesh network is likely the better choice for ease of use and consistent performance.
Sometimes, even after trying all the usual fixes - like restarting your router, changing channels, or moving equipment around - the WiFi issues persist. That’s when it’s time to call in the pros. Certified technicians can diagnose problems that go beyond basic troubleshooting. These could include things like interference from hidden microwave harmonics, damaged Ethernet cables, or signal disruptions caused by reflective surfaces.
You should consider professional help if your internet speed consistently drops below 50% of your plan, if you’re dealing with persistent dead zones in larger or multi-story spaces, or if advanced setups like mesh systems aren’t working as expected. Dense urban environments, where overlapping networks are common, can also benefit from professional expertise. Tools like spectrum analyzers and WiFi mapping software (e.g., NetSpot or Ekahau) allow professionals to pinpoint issues that DIY fixes often miss.
"You should contact a professional if basic troubleshooting steps do not resolve the issue, if you experience frequent or persistent network problems, or if you suspect a security breach." - TekDash
Hiring a professional can save you time and improve your network’s reliability. Technicians can optimize router placement, choose the best channels, update firmware securely, and even segment IoT devices onto separate networks to avoid congestion. This process can result in speeds up to three times faster and near-perfect uptime, saving users an estimated 10-20 hours of trial-and-error troubleshooting. For businesses, the cost-effectiveness is clear: with productivity losses averaging $50 per hour, professional help becomes essential when downtime exceeds $200 per day.
If you’re looking for tailored diagnostics and lasting solutions, professional services like TekDash can turn a frustrating network into a seamless experience.

TekDash provides both on-site and remote support to tackle WiFi interference and coverage problems. Their certified technicians specialize in services like WiFi and Ethernet installation, signal extension, wired backhaul setup, interference analysis, and smart home device configuration - all designed to optimize your network’s performance.
Here’s how their pricing works: on-site support starts at $145 for the first 90 minutes, with an additional $75 per hour after that. Remote support is more affordable, starting at $60 for the first 90 minutes and $40 for each additional hour. A 15% quality assurance fee applies to all services. On-site visits are particularly useful for larger homes (over 2,000 square feet), as they allow technicians to physically inspect for issues like damaged cables, interference from appliances, and improper hardware placement. Meanwhile, remote support can handle quicker fixes, such as firmware updates or channel adjustments, resolving around 60% of issues without requiring an in-person visit.
TekDash’s services are designed for long-term reliability, even in complex setups. For example, a recent customer in Alexandria, VA, upgraded their home network with extensive Cat6 cabling and a dedicated 6U network rack, resulting in a professional-grade installation.
"TekDash's innovative approach delivered a professional-grade home network, exceeding my expectations." - Larry P, Customer
TekDash has earned high praise, with 21 reviews highlighting their expertise in network troubleshooting and a "Best in Class" service designation. Customers frequently commend their quick response times, transparent pricing, and ability to resolve issues on the first visit. Whether you’re dealing with WiFi interference or need a large-scale installation, TekDash’s targeted solutions go beyond basic troubleshooting to deliver reliable, long-term performance improvements.
WiFi interference doesn't have to be an ongoing headache. The steps outlined in this guide tackle the most common culprits behind sluggish or unreliable connections. By managing physical obstructions, tweaking device settings, reducing electronic interference, and strategically boosting coverage, you can significantly improve network performance.
For both homes and businesses, these adjustments can lead to noticeable improvements. Simple actions like repositioning your router and selecting the best channel can eliminate dead zones and ensure devices connect to the ideal frequency for better speed and stability.
That said, not every problem can be solved with a DIY approach. Persistent connectivity issues or stubborn dead zones may require professional help. Certified technicians have the tools and expertise to identify hidden sources of interference and provide long-term fixes.
If you're facing challenges that go beyond basic solutions, professional services like TekDash can help. They specialize in diagnosing complex WiFi issues and setting up robust networks. Their technicians offer both on-site and remote support: on-site services start at $145 for the first 90 minutes, with an additional $75 per hour, while remote support begins at $60 for the first 90 minutes and $40 for each additional hour. A 15% quality assurance fee applies to all services.
"TekDash's innovative approach delivered a professional-grade home network, exceeding my expectations." - Larry P, Customer
To figure out whether your WiFi problem stems from interference or weak coverage, pay attention to how your connection behaves. Interference typically leads to inconsistent signals, slower speeds, or frequent disconnections, especially near devices like microwaves or cordless phones. On the other hand, weak coverage shows up as consistently low signal strength, particularly in areas farther from the router. Tools like WiFi analyzers can help you spot crowded channels, while testing signal strength in various spots can pinpoint the issue.
For most devices, the 5 GHz band works best since it experiences less congestion and interference compared to 2.4 GHz. If your devices support Wi-Fi 6E, switch to 6 GHz for faster speeds and even less interference. Save the 2.4 GHz band for devices that require a longer range and can tolerate higher levels of interference.
If moving your router, switching channels, or minimizing interference hasn’t fixed your WiFi issues, it might be time to call in the experts. Persistent problems like weak signals, sluggish speeds, frequent dropouts, or constant interference often need professional attention. TekDash provides both on-site and remote tech support to pinpoint the problem and fine-tune your network, making sure you get the reliable connection you need when DIY solutions don’t cut it.
Pinpoint causes of WiFi interference and restore stable connectivity with band switching, router placement, channel tuning, mesh systems, or pros.
Identify and fix smart home WiFi interference: causes, diagnosis tips, channel choices, router placement, mesh upgrades, and pros.
Identify and fix WiFi channel overlap: symptoms, causes, and practical steps like using analyzers, choosing non-overlapping channels, adjusting...